
Upgrade Your Ab Workout: 14 Exercises That Crush Crunches
When it comes to flat abs, endless crunches don’t work!
Regardless of your age, the key to a flatter stomach is training your entire core, including exercises that target different areas of your abdominals.
So, if you can’t stand crunches or simply want to mix up your core workout routine, try these 14 effective ab exercises that target all of your abdominal muscles, including your obliques, lower abs, and upper abs.
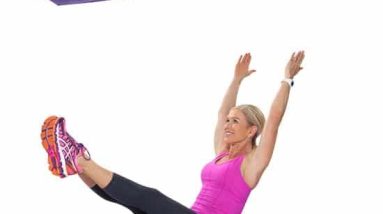
1. V-Ups 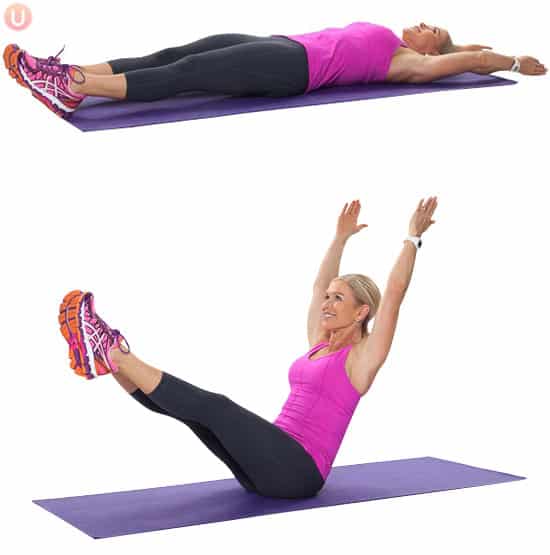 Photo Credit: Get Healthy U
V-ups are one of the best ab workouts because they also develop incredible balance.
- Lie flat on the floor and extend your arms behind your head. Keep your feet together and your toes pointed.
- Keep your legs straight and lift them up as you simultaneously raise your upper body off the floor. Keep your core tight as you reach for your toes with your hands. Slowly lower yourself back down to the starting position.
Targets: transverse abdominus, rectus abdominus
2. Side Plank Dips
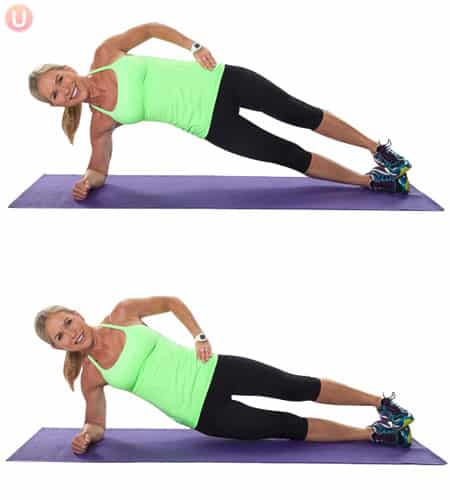 Photo Credit: Get Healthy U
Side plank dips are oblique exercises for anyone looking to develop core strength and enviable side abs.
- Start by laying on your right side with forearm below shoulder, body lifted and legs long, and feet stacked. Keep body straight, abs tight, and place left hand on hip.
- Dip your hips down towards the mat and lift back up using your obliques and core muscles.
Targets: internal obliques, external obliques
3. Side Plank Reach Through
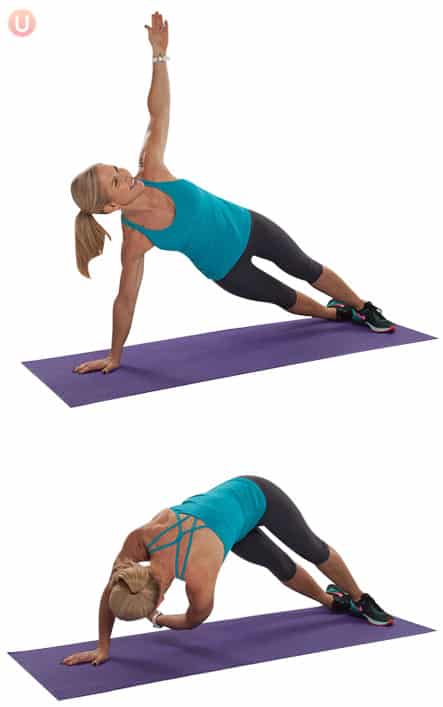 Photo Credit: Get Healthy U
The side plank reach-through is one of the best ab oblique combination movements. You must keep your core engaged the entire time – you’ll be feeling this move!
- Begin in a full side plank position with the right hand below shoulder, left arm reaching high above left shoulder, and legs long. (Modify by placing bottom knee onto mat if needed)
- Tighten the abdominals and slowly scoop the left arm under the body, following with your eyes until you see behind you.
- Slowly reach the left hand back to start position.
- Repeat for the desired number of repetitions and switch sides.
Targets: transverse abdominus, internal obliques, external obliques, rectus abdominus
4. Toe Reach
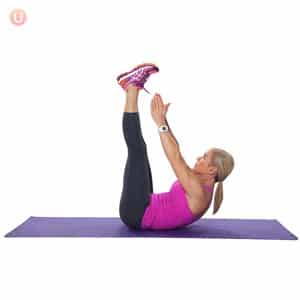 Photo Credit: Get Healthy U
The toe reach is different than the classic crunch you see in most ab workouts. This move focuses more on total core engagement.
- Start on the back with legs long-reaching towards the ceiling.
- Bring the head, neck, and shoulders off the mat and reach arms up towards the feet. Return to the tips of the shoulders and repeat.
Targets: rectus abdominus, transverse abdominus
5. Forearm Plank
 Photo Credit: Get Healthy U
The plank is a staple of most ab workouts because it recruits the entire core.
- Begin lying on the floor with your forearms flat on the floor, making sure that your elbows are aligned directly under your shoulders.
- Engage your core and raise your body up off the floor, keeping your forearms on the floor and your body in a straight line from head to feet. Keep your abdominals engaged, and try not to let your hips rise or drop.
Targets: transverse abdominus
6. Bicycle Crunches
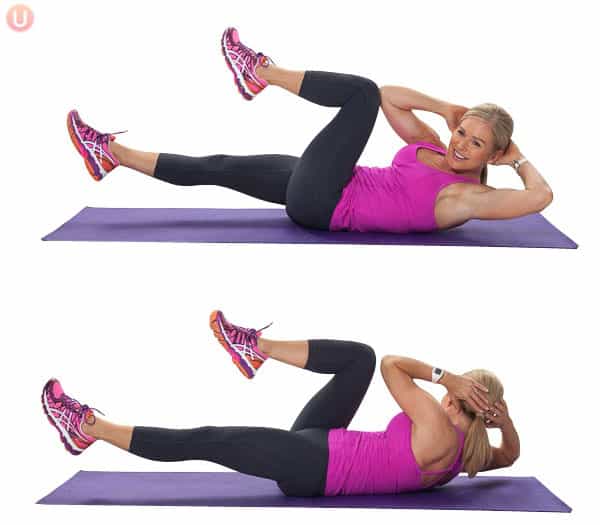 Photo Credit: Get Healthy U
The bicycle crunch builds coordination and a strong core, and is one of the best ab movements out there!
- Start lying on your back with feet off the floor and legs in a tabletop position. Hands are behind the head, and the head, neck, and shoulders are flexed off the mat.
- Bring one knee in and reach the opposite elbow towards it. Repeat on the other side in a crisscross motion working the obliques.
Targets: transverse abdominus, internal obliques, external obliques, rectus abdominus
7. Boat Pose
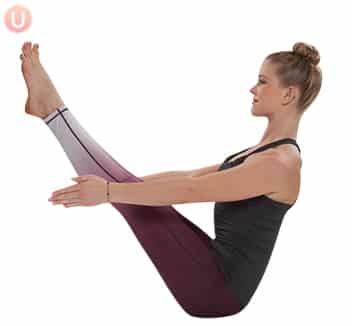 Photo Credit: Get Healthy U
The boat pose is deceptively simple. This move takes incredible core strength and builds core strength. A win-win.
- From a seated position, draw your navel in toward your spine, bracing the abdominals.
- With your hands on the floor behind you, bring your legs up off the floor with your knees bent in front of the chest.
- Keeping abdominals tight, slowly lift hands off the floor and reach them forward and up while lengthening legs upward. Your body will look like a “V” shape. Lengthen your spine as you hold. (If your hamstrings are too tight, you can bend your knees.)
- Keep abdominals tight and breathe. Stay for 30-60 seconds or as long as you can.
Targets: transverse abdominus, rectus abdominus
8. Sweeping Scissors
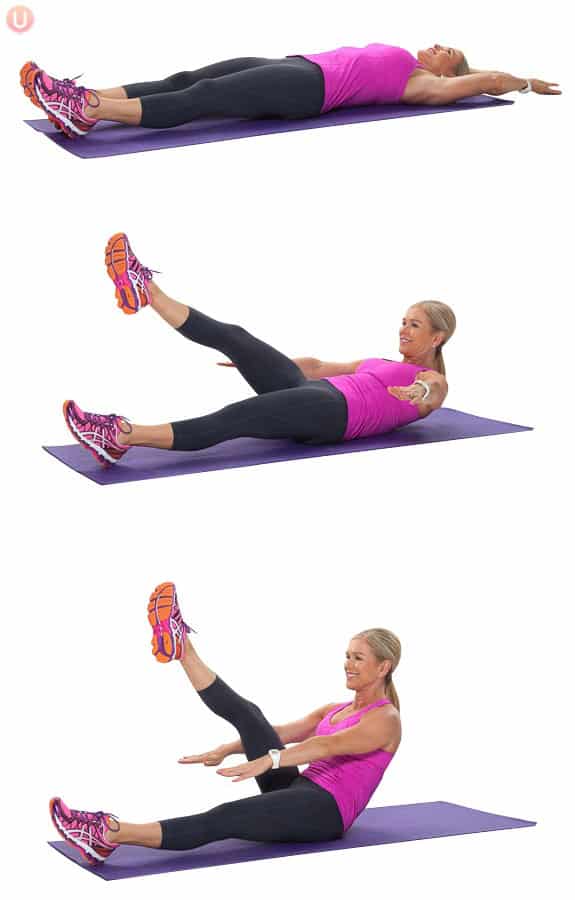 Photo Credit: Get Healthy U
Ready for a challenge?
- Start lying on the mat with arms over your head and legs long.
- Sweep arms out to the sides and bring your head, neck, and shoulders off the mat.
- Reach your arms long and lift one leg up and in towards the chest. Reach your arms forward on the sides of the leg. Roll back to the mat, lowering your leg, and repeat on the other side.
Targets: transverse abdominus, rectus abdominus
9. Side To Side Obliques
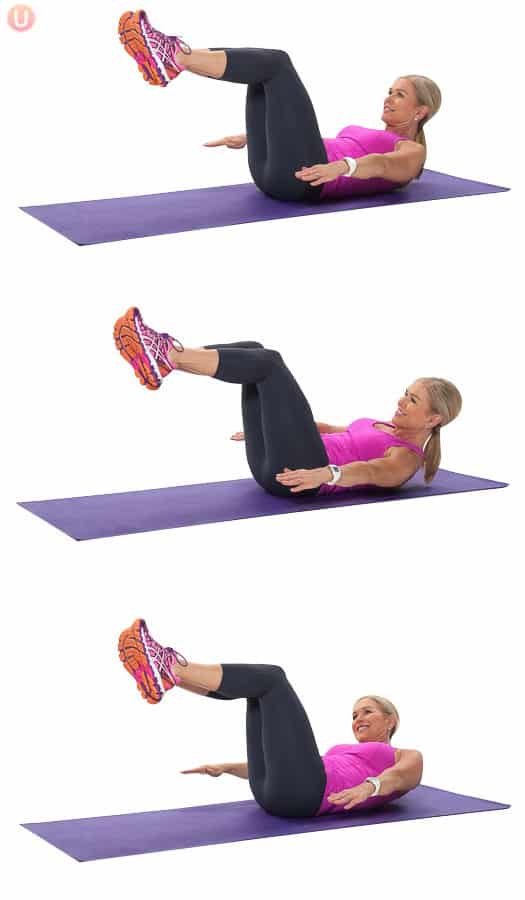 Photo Credit: Get Healthy U
The side-to-side oblique move is one of the best ab exercises for targeting the obliques.
- Lie on the mat and bring your knees into the chest, forming a tabletop position. Bring the head, neck, and shoulder off the mat while coming into a crunch, reaching your arms long at the sides.
- Exhale as you reach your right fingers to the right side in a forward motion, then return to center on the inhale. Exhale and reach left fingers to the left side in the same motion. Switch side to side without lowering onto the mat.
Targets: transverse abdominus, internal obliques, external obliques, rectus abdominus
10. Bend Extend Ab Tuck
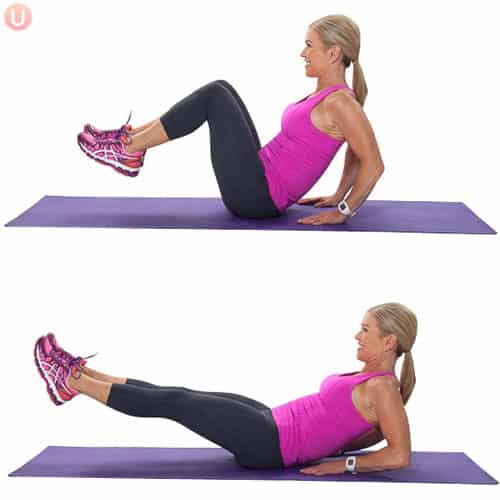 Photo Credit: Get Healthy U
Ab workouts don’t have to be boring. There’s always a new variation to try, just like this bend extends ab tuck.
- Start seated on the mat with arms behind you, hands on the mat, and fingers facing your backside. Sit back on your hands and lift up your feet off the mat keeping the knees bent.
- Keep abs tight and press your legs out long while slightly lowering your back. You should feel your lower abdominals working, then push yourself back up and pull your knees in to return to your starting position.
Targets: transverse abdominus, rectus abdominus
11. Spiderman Abs
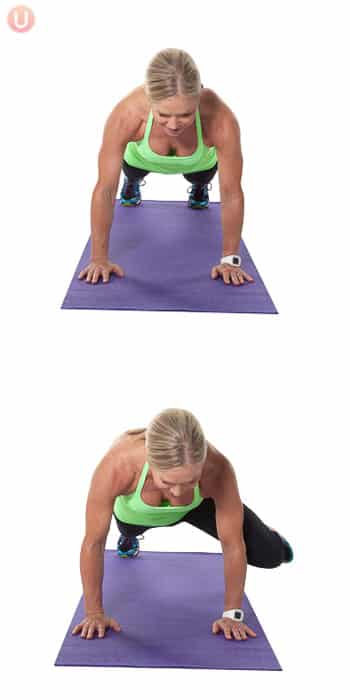 Photo Credit: Get Healthy U
Spiderman abs is a move that hurts so good! Give it a try, and your lower abs will be at attention.
- Start in a plank position with hands on the mat slightly wider than shoulders, legs long behind you, and abdominals and glutes squeezed tight.
- Pull the left knee toward the outside of your left elbow and hold for one count. Return to the starting and repeat on the right side.
Targets: transverse abdominus, external obliques, internal obliques
12. Forearm Star Plank
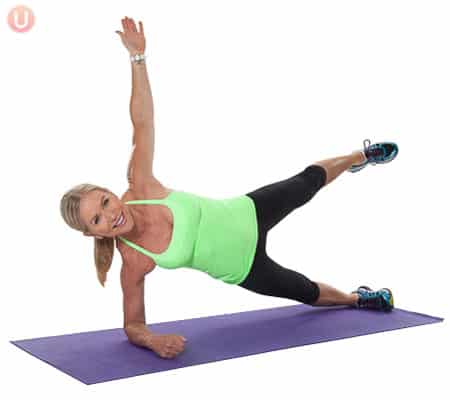 Photo Credit: Get Healthy U
This forearm star plank is a variation on the plank that will help you strengthen your core and those elusive lower abs.
- Begin lying on the right side, forearm on the floor, body lifted, and legs extended long on the mat with feet stacked.
- Tighten the abdominals and lift the left leg and arm up in the air. Hold them straight and keep the body still for the desired amount of time. Switch sides.
Targets: external obliques, internal obliques, transverse abdominus
13. Hip Dips
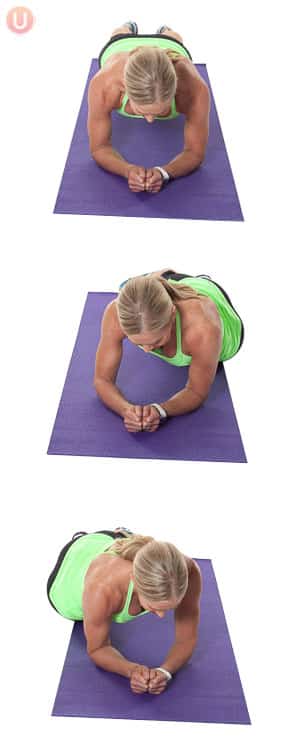 Photo Credit: Get Healthy U
Hip dips really build those oblique muscles!
- Begin in a forearm plank position with your forearms flat on the mat, making sure that your elbows are aligned directly under your shoulders, your core is engaged, and your body is in a straight line from your head to your feet.
- Lower your left hip toward the floor until it almost touches, and then immediately raise back to the center.
- Repeat on the right side.
Target: transverse abdominus, external obliques, internal obliques
14. Double Leg Stretch
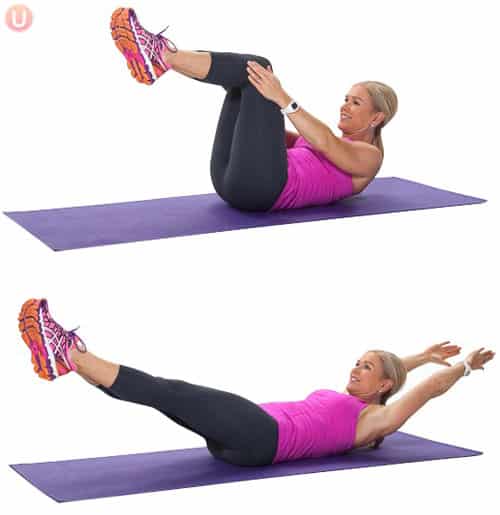 Photo Credit: Get Healthy U
You’ll definitely feel the burn with this one. (Which is a good thing!)
- Start lying on your back with knees bent 90 degrees and arms lengthened alongside the calves. Your lower back should be pressed against the mat with your head, neck, and shoulders flexed up off the mat.
- As you inhale, stretch your arms straight behind your head and legs straight to a diagonal position in front. As you exhale, circle your arms around and back to your legs while drawing your knees back into the 90-degree angle. Repeat for the desired number of reps.
Targets: transverse abdominus, rectus abdominus
Strength Training for Women Over 50: 11 Best Moves  Photo Credit: Get Healthy U
While aging is inevitable, aging well is not.
There are many factors involved in maintaining good physical and mental health as you age, but one of the most important things to consider as you grow older is weight training. Thesestrength training exercises are proven to get results for women over 50.
Strength Training for Women Over 50: 11 Best Moves
3 Walking Workouts For Weight Loss  Photo Credit: Depositphotos
If you want to start working out or get back in shape after taking a break from exercise, there’s no better—or more convenient—form of exercise than walking. Walking is low-impact and doable for almost everyone, but if weight loss is your goal, we’re here to tell you that intensity is the key to success.
3 Walking Workouts For Weight Loss
The Best Love Handle Workout 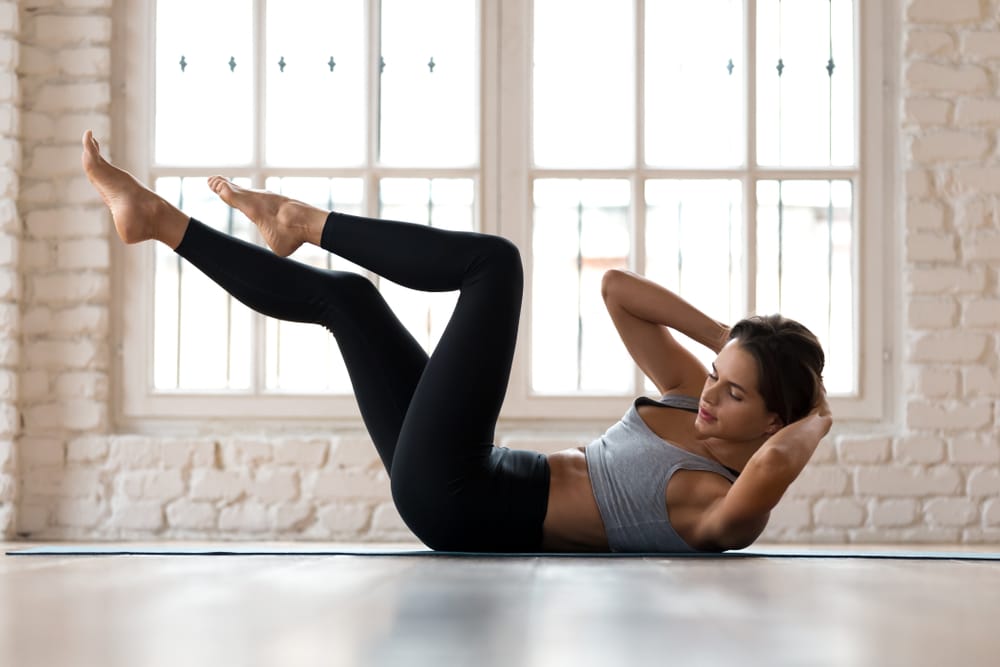 Photo Credit: Shutterstock
These five exercises specifically target the love handles and will have you feeling the burn!
Combine this workout with a healthy diet and cardio, and you’ll watch that belly fat “waist” away.
The Best Love Handle Workout

Patricia Smit Dominates the 2023 Netherlands Strongest Woman Competition
The 2023 Netherlands Strongest Woman contest was held on Sept. 17, 2023, in Earnawâld, Netherlands — one day after the 2023 Netherlands Strongest Man U105KG competition. Patricia Smit stood atop the podium in the former contest, while Yoell Blom ranked first in the latter.
Smit scored 61 of a possible 72 points across six events against 11 other strongwoman athletes. Blom raked in 65 of a possible 72 points through the same five events: Deadlift, Bag Toss Medley, Yoke Into Sandbag, Farmer’s Walk, Overhead Ladder, and Atlas Stones.
2023 Netherlands Strongest Woman Results
- Patricia Smit — 61 points
- Mayke Van Wouven — 59 points
- Femke Huisman — 58 points
- Elisa Hessels — 51 points
- Kelly Franssen — 48 points
- Jamie Lee Boudri — 42 points
- Christel Veenstra — 31 points
- Rowena Wehnes — 31 points
- Chelsea Schweiger — 25 points
- Linda Schenk — 24 points
- Yvonne Allards — 21 points
- Femkje Buijs — 17 points
[Related: Mitchell Hooper Explains How Better Cardio Fuels Strength Gains]
2023 Netherlands Strongest Man U105KG Results
- Yoell Blom — 65 points
- Joey Henraath — 57.5 points
- Wim Van De Groep — 53 points
- Christian Van Elderen — 48 points
- Randy Doornekamp — 45 points
- Ruben Van Kreij — 45 points
- John-Mark Bolwerk — 44.5 points
- Jeffrey Laterveer — 38 points
- Tom Van De Burg — 26 points
- Toni Pieters — 23 points
- Alex Schiltmans — 13 points
- Kane Verberkt — 10 points
[Related: How To Do the Alternating Dumbbell Press (+ the Best Variations for Muscle and Strength)]
View this post on InstagramA post shared by Patricia Smit (@miss_silverback)
[Related: How Many Calories Should I Eat Per Day? A Guide for All Your Fitness Goals]
2023 Netherlands Strongest Woman Event Results
Below are the results for each of the five events comprising the 2023 Netherlands Strongest Woman contest:
Deadlift For Reps
Each athlete was tasked to lift 140, 160, 180, 200, and 220 kilograms for as many reps as possible in the 75-second time cap. A single rep at a higher weight trumped any number of reps at a lower weight.
- Patricia Smit — Three of 220 kilograms in 65.59 seconds
- Femke Huisman — One of 220 kilograms in 42.17 seconds
- Mayke Van Wouven — One of 200 kilograms in 71.62 seconds
- Kelly Franssen — One of 200 kilograms in 21.52 seconds
- Yvonne Allards — One of 200 kilograms in 43.93 seconds
- Elisa Hessels — Two of 180 kilograms in 49.37 seconds
- Jamie Lee Boudri — Two of 180 kilograms in 53.58 seconds
- Rowena Wehnes — One of 180 kilograms in 16.02 seconds
- Linda Schenk — Five of 160 kilograms in 66.11 seconds
- Christel Veenstra — Four of 160 kilograms in 72.27 seconds
- Femkje Buijs — Two of 160 kilograms in 30.33 seconds
- Chelsea Schweiger — One of 160 kilograms in 20.52 seconds
Bag Toss Medley
The Bag Toss over a four-meter bar consisted of five implements weighing 10, 12, 14, 16, and 18 kilograms.
- Patricia Smit — Four in 26.06 seconds
- Mayke Van Wouven — Four in 40.71 seconds
- Kelly Franssen — Four in 48.86 seconds
- Femke Huisman — Three in 23.27 seconds
- Elisa Hessels — Three in 25.05 seconds
- Jamie Lee Boudri — Three in 26.8 seconds
- Rowena Wehnes — Three in 59.95 seconds
- Femkje Buijs — Two in 17.77 seconds
- Chelsea Schweiger — One in 5.68 seconds
- Christel Veenstra — One in 11.83 seconds
- Linda Schenk — One in 12.8 seconds
- Yvonne Allards — One in 15.74 seconds
Yoke Into Sandbag
The yoke and sandbag weighed 210 and 80 kilograms, respectively. Each implement had to be carried down a 15-meter course.
- Elisa Hessels — Two in 15.91 seconds
- Patricia Smit — Two in 17.04 seconds
- Mayke Van Wouven — Two in 18.78 seconds
- Femke Huisman — Two in 19.19 seconds
- Jamie Lee Boudri — Two in 21.79 seconds
- Kelly Franssen — Two in 22.09 seconds
- Christel Veenstra — Two in 23.63 seconds
- Chelsea Schweiger — Two in 27.47 seconds
- Linda Schenk — Two in 30 seconds
- Yvonne Allards — Two in 30.62 seconds
- Rowena Wehnes — Two in 34.47 seconds
- Femkje Buijs — Two in 35.57 seconds
Farmer’s Walk
Each athlete carried 60 kilograms down a 20-meter course for distance.
- Christel Veenstra — 93.9 meters
- Chelsea Schweiger — 91.8 meters
- Mayke Van Wouven — 82.2 meters
- Elisa Hessels — 83.5 meters
- Femke Huisman — 80.5 meters
- Jamie Lee Boudri — 80 meters
- Linda Schenk — 70.8 meters
- Patricia Smit — 67.2 meters
- Yvonne Allards — 66.1 meters
- Kelly Franssen — 65.7 meters
- Femkje Buijs — 60 meters
- Rowena Wehnes — 59.8 meters
Overhead Ladder
Within the 75-second time cap, each athlete attempted to lift 40, 50, 60, 70, or 80 kilograms. One rep at a higher weight outranked any number of reps at a lower weight.
- Femke Huisman — Four of 80 kilograms in 62.8 seconds
- Rowena Wehnes — Three of 80 kilograms in 63.9 seconds
- Mayke Van Wouven — Three of 80 kilograms in 67.14 seconds
- Patricia Smit — Three of 80 kilograms in 74.85 seconds
- Kelly Franssen — Two of 80 kilograms in 69.8 seconds
- Jamie Lee Boudri — Two of 80 kilograms in 70.42 seconds
- Elisa Hessels — Two of 70 kilograms in 64.02 seconds
- Femkje Buijs — One of 70 kilograms in 30.67 seconds
- Linda Schenk — One of 70 kilograms in 35.24 seconds
- Yvonne Allards — Four of 60 kilograms in 64.3 seconds
- Christel Veenstra — Four of 60 kilograms in 72.2 seconds
- Chelsea Schweiger — Three of 60 kilograms in 61.61 seconds
Atlas Stones
The six Atlas Stones weighed 50, 80, 90, 100, 110, and 120 kilograms.
- Patricia Smit — Six in 41.68 seconds
- Mayke Van Wouven — Six in 52.75 seconds
- Kelly Franssen — Five in 29.83 seconds
- Femke Huisman — Five in 40.09 seconds
- Elisa Hessels — Five in 54.08 seconds
- Jamie Lee Boudri — Four in 28.65 seconds
- Rowena Wehnes — Four in 30.74 seconds
- Christel Veenstra — Four in 36.52 seconds
- Linda Schenk — Four in 42.36 seconds
- Chelsea Schweiger — Four in 45.58 seconds
- Femkje Buijs — Three in 33.11 seconds
- Yvonne Allards — Three in 81.02 seconds
[Related: Develop a Better Mind-Muscle Connection With These Quick Tips]
View this post on InstagramA post shared by Yoëll Blom | krachtcoach (@yoellblom)
[Related: How to Make Homemade Meal Replacement Shakes to Fuel Your Training Goals]
2023 Netherlands Strongest Man U105KG Event Results
Below are the results for each of the five events comprising the 2023 Netherlands Strongest Man U105KG contest:
Deadlift For Reps
The available weights were 200, 220, 240, 260, and 280 kilograms for as many reps as possible in the 75-second time cap. A single rep at a higher weight outranked any number of reps at a lower weight.
- Tom Van De Burg — Five of 280 kilograms in 65 seconds
- Yoell Blom — Five of 280 kilograms in 74 seconds
- Ruben Van Kreij — Three of 280 kilograms in 60 seconds
- John-Mark Bolwerk — Three of 280 kilograms in 64 seconds
- Wim Van De Groep — Three of 280 kilograms in 70 seconds
- Joey Henraath — Two of 280 in 45 seconds
- Jeffrey Laterveer — One of 280 kilograms in 47 seconds
- Randy Doornekamp — Three of 260 kilograms in 63 seconds
- Christian Van Elderen —Two of 260 kilograms in 70 seconds
- Toni Pieters — Two of 260 kilograms in 75 seconds
- Alex Schiltmans — One of 260 kilograms in 36 seconds
- Kane Verberkt — One of 240 kilograms in 14 seconds
Bag Toss Medley
The Bag Toss over a four-meter bar consisted of five implements weighing 18, 20, 22, 24, and 26 kilograms.
- Randy Doornekamp — Five in 17.62 seconds
- Yoell Blom — Five in 21.56 seconds
- Christian Van Elderen — Five in 22.9 seconds
- Ruben Van Kreij — Five in 25 seconds
- Joey Henraath — Five in 30.07 seconds
- Wim Van De Groep — Five in 46.97 seconds
- Jeffrey Laterveer — Four in 14 seconds
- John-Mark Bolwerk — Four in 22 seconds
- Toni Pieters — Four in 42 seconds
- Tom Van De Burg — Three in 38 seconds
- Kane Verberkt — Two in 11 seconds
- Alex Schiltmans — Two in 12 seconds
Yoke Into Sandbag
The yoke and sandbag weighed 340 and 120 kilograms, respectively, to be carried down a 15-meter course.
- Joey Henraath — 19.97 seconds (T-first)
- John-Mark Bolwerk — 19.97 seconds (T-first)
- Wim Van De Groep — 21.78 seconds
- Jeffrey Laterveer — 22.94 seconds
- Yoell Blom — 23.63 seconds
- Christian Van Elderen — 24.15 seconds
- Ruben Van Kreij — 25.4 seconds
- Randy Doornekamp — 36.47 seconds
- Tom Van De Burg — 39.65 seconds
- Toni Pieters — 42.66 seconds
- Kane Verberkt — 48.01 seconds
- Alex Schiltmans — 50.69 seconds
Farmer’s Walk
This walk for distance along a 20-meter course involved 110 kilograms.
- Wim Van De Groep — 64.3 meters
- Yoell Blom — 60 meters
- Joey Henraath — 59.1 meters
- Christian Van Elderen — 54.5 meters
- Randy Doornekamp — 52.1 meters
- John-Mark Bolwerk — 49.75 meters
- Jeffrey Laterveer — 41.35 meters
- Ruben Van Kreij — 40 meters
- Kane Verberkt — 33 meters
- Alex Schiltmans — 24.1 meters
- Tom Van De Burg — 23.3 meters
- Toni Pieters — 23.1 meters
Overhead Ladder
The weights were 80, 90, 100, 110, and 120 kilograms. A single rep at a higher weight outranked any number of reps at a lower weight.
- Yoell Blom — Three of 120 kilograms in 58.27 seconds
- Joey Henraath — Three of 120 kilograms in 60.62 seconds
- Randy Doornekamp —Three of 120 kilograms in 65.37 seconds
- Christian Van Elderen — Three of 120 kilograms in 70.78 seconds
- Ruben Van Kreij — Three of 120 kilograms in 73.37 seconds
- Jeffrey Laterveer — Two of 120 kilograms in 60.18 seconds
- Toni Pieters — Two of 120 kilograms in 65.75 seconds
- Wim Van De Groep — One of 120 kilograms in 39.83 seconds
- John-Mark Bolwerk — One of 110 kilograms in 35.11 seconds
- Tom Van De Burg — One of 110 kilograms in 39.61 seconds
- Alex Schiltmans — One of 110 kilograms in 47.26 seconds
- Kane Verberkt — One of 100 kilograms in 23.46 seconds
Atlas Stones
Within 90 seconds to a 1.15-meter platform, each athlete loaded six stones weighing 130, 140, 150, 160, 170, and 180 kilograms in the fastest time possible.
- Yoell Blom — Six in 79.53 seconds
- Wim Van De Groep — Five in 32.54 seconds
- Joey Henraath — Five in 61.18 seconds
- Christian Van Elderen — Five in 88.28 seconds
- John-Mark Bolwerk — Four in 32.52 seconds
- Ruben Van Kreij — Four in 55.71 seconds
- Toni Pieters — Three in 58.86 seconds
- Randy Doornekamp — Two in 14.74 seconds
- Jeffrey Laterveer — Two in 15.85 seconds
- Alex Schiltmans — Two in 18.65 seconds
- Tom Van De Burg — Two in 23.65 seconds
- Kane Verberkt — One in 18.05 seconds
More Strongman Content
- 2023 England’s Strongest Man and Strongest Woman Results
- Gavin McNamee Wins 2023 UK’s Strongest Man U90KG
- Brian Shaw Suffered a Torn Pec at the 2023 Shaw Classic
Featured image: @miss_silverback on Instagram
The post 2023 Netherlands Strongest Woman Results — Patricia Smit Victorious appeared first on BarBend.

10 Compelling Reasons to Embrace a Raw Food Lifestyle

There has been a renewed interest in incorporating raw foods into the diet the past few years. I make a point of eating raw food 80 % of my dietary daily intake and encourage my clients to do the same. Eating raw food has several health benefits. The process of cooking food depletes vitamins, destroys enzymes that help us digest our food, and damages vital fats and protein. While raw food is raw and unprocessed, cooked food creates free radicals which are major contributors to cancer and many other illnesses.
The most important reason to eat raw is to benefit from the enzymes. Enzymes can rightfully be called the fountain of youth. They are necessary for breaking down and absorbing the food that we eat. Enzymes are essential for the body’s vitality. Simply put, we are not what we eat we are what we digest. All food that we eat must be broken down. Our cells cannot absorb large structures. Protein must be broken down into amino acids, complex carbohydrates into simple sugars and fats into fatty acids. This is a huge job for our bodies and where most health problems begin. Without enzymes digestion can become very compromised. When we cook our food, we lose the enzymes. Heating food to over 118 degrees Fahrenheit destroys the enzymes present in the raw ingredients. Food that contains few or no enzymes depletes your body of its own natural resources, accelerates the ageing process, and can cause illness due to a struggling digestion system.
If possible, try to eat fruits and vegetables that are organic. Crops today are heavily sprayed with herbicides and pesticides and this can be very toxic to the gut microbiome. If you are unable to purchase organic food, try using a vegetable and fruit cleanser, available in most health food stores. This would help to remove bacteria and pesticide residue. Scrub root vegetables with a stiff brush that you use just for your food. There is a list well documented from the EWG called the “CLEAN 15 AND DIRTY DOZEN” that you could take a look at for what is recommended to go strictly organic and where you can be more flexible. https://eatrealamerica.com/wp-content/uploads/2019/03/EWG-Clean-15-and-Dirty-Dozen-PDF.pdf
Try not to go overboard on spinach, Swiss chard, and kale. These foods contain oxalic acid, which inhibits the absorption of the essential mineral’s calcium, magnesium, and zinc. This does not mean that you must avoid them completely as they do contain important nutrients. Adding these greens to your salads a couple of times a week would be fine.
Other benefits from eating a raw food diet include experiencing an improvement in skin and increased energy. It is important to stay fully hydrated if you want nice skin and the fact that fruits and vegetables contain a lot of water allows you to do just that. In fact, the quality of the water in organic fruits and vegetables is much safer and higher than in tap water as there are no chemicals, only nutrients. If you eat raw food, you will notice that you are less thirsty and therefore can get away with drinking less water.
If you are looking to lose some weight, eating rawer will certainly help you do just that. Raw foods, being unprocessed, there is no need to worry about extra fats, sugars, and additives which are the main contributors to weight gain. Added to this, the quantity of fiber that you get eating raw as opposed to cooked will increase elimination resulting in less bloat and constipation.
To conclude, I am not suggesting that we all gravitate to a completely raw diet. But it would make a big difference if we all focused a little bit more on what we are fueling our body with. Perhaps just try to include more fruit and salads each day. When you are eating a cooked meal adding some leafy greens for added enzymes can make all the difference on how you digest that meal.
The post reasons to go raw appeared first on Total Gym Pulse.
The Ultimate Guide to Shedding Hip Fat: Expert Tips and Tricks
How to Reduce Hip Fat: A Comprehensive Guide Blog – HealthifyMe Blog – HealthifyMe – The definitive guide to weight loss, fitness and living a healthier life.
Excess hip fat can be a source of frustration and concern for many individuals. Whether it’s for health reasons or simply to boost self-confidence, the quest to reduce hip fat is a common goal. If you’ve found yourself searching for ways to trim down your hips, you’re not alone. In this comprehensive guide, we will explore effective strategies, tips, and techniques to help you achieve your goal of reducing hip fat.
Understanding the dynamics of hip fat, its impact on your overall health, and the factors contributing to its accumulation is the first step in your journey. From there, we will delve into practical steps you can take, including adopting healthy eating habits, incorporating targeted exercises, making lifestyle changes, and even considering supplements to aid your efforts. Tracking your progress and staying motivated are also crucial aspects of this journey.
By the end of this guide, you’ll have a well-rounded understanding of how to reduce hip fat and the tools necessary to embark on this transformative journey towards a healthier, more confident you. So, let’s dive in and discover the path to achieving those desired results and embracing life with reduced hip fat.
Types of Hip Fat
When it comes to addressing hip fat, it’s crucial to understand the two primary types of fat that can accumulate in this area: subcutaneous fat and visceral fat.
Subcutaneous Fat
Subcutaneous fat is the fat that lies just beneath the skin’s surface in the hip and thigh area.
It is the type of fat that you can typically pinch and feel.
While subcutaneous fat is less harmful to your health compared to visceral fat, excessive accumulation can still affect your appearance and self-confidence.
Subcutaneous fat serves as a source of energy and helps regulate body temperature.
Visceral Fat
Visceral fat, also known as intra-abdominal or organ fat, is the fat that surrounds your internal organs, including those in the abdominal and hip regions.
It is not visible from the outside, making it different from subcutaneous fat.
High levels of visceral fat are associated with increased health risks, including heart disease, type 2 diabetes, and certain cancers.
Visceral fat can release inflammatory substances that can negatively impact your overall health.
Factors Contributing to Hip Fat Accumulation
To effectively reduce hip fat, it’s essential to recognize the various factors that can contribute to its accumulation. Understanding these contributing factors can help you make informed choices and tailor your approach to target hip fat effectively. Here are the key factors:
Dietary Habits
High-Calorie Intake: Consuming more calories than your body needs can lead to fat storage, including in the hip area. A diet rich in high-calorie, processed, and sugary foods can contribute to hip fat accumulation.
Unhealthy Fats: Diets high in saturated and trans fats can promote fat storage in the hip region. Replacing these fats with healthier options like monounsaturated and polyunsaturated fats can be beneficial.
Physical Activity Levels
Sedentary Lifestyle: Lack of regular physical activity and prolonged periods of sitting can lead to the storage of excess fat in the hips and other areas. Incorporating more movement into your daily routine is crucial for burning calories and reducing hip fat.
Lack of Strength Training: Focusing solely on cardio exercises without incorporating strength training can limit your ability to tone and shape your hip area. Resistance exercises can help build muscle and boost metabolism.
Hormonal Changes
Menopause: Women going through menopause often experience hormonal changes that can lead to increased fat storage, especially in the hips and abdomen. Hormone replacement therapy and a balanced diet can help manage this.
Imbalanced Hormones: Hormonal imbalances, such as insulin resistance or thyroid disorders, can contribute to fat accumulation around the hips. Consult with a healthcare provider to address these issues.
Stress
Chronic stress triggers the release of cortisol, a hormone associated with fat storage, particularly around the abdominal and hip areas. Stress management techniques, such as meditation and yoga, can help reduce cortisol levels.
Lack of Sleep
Poor sleep patterns and inadequate rest can disrupt hormones related to appetite and metabolism, potentially contributing to hip fat gain. Aim for 7-9 hours of quality sleep each night.
Summary
Effectively reducing hip fat necessitates a thorough understanding of the contributing factors. These factors include dietary habits like high-calorie intake and unhealthy fats, which can promote fat storage in the hip area. Sedentary lifestyles and a lack of strength training can hinder fat reduction, while hormonal changes, such as those during menopause or due to imbalanced hormones, may lead to increased hip fat. Chronic stress and insufficient sleep can further exacerbate the issue by triggering cortisol release and disrupting appetite-regulating hormones. Addressing these factors through dietary adjustments, physical activity, stress management, and adequate sleep is essential for effective hip fat reduction.
Effective Exercises to Reduce Hip Fat
Now that we’ve gained an understanding of the factors contributing to hip fat accumulation, it’s time to explore effective exercises that can help you trim and tone your hips. Incorporating targeted workouts into your fitness routine is key to achieving your goal of reducing hip fat. Below are some exercises that focus on the hip area:
A. Squats
How to Perform: Stand with your feet shoulder-width apart. Lower your body by bending your knees and hips, as if you’re sitting back into an imaginary chair. Keep your back straight and chest up. Push through your heels to return to the starting position.
Benefits: Squats target the muscles in your hips, thighs, and buttocks, helping to shape and tone these areas while burning calories.
B. Lunges
How to Perform: Take a step forward with one leg and lower your body until both knees are bent at a 90-degree angle. Keep your front knee directly above your ankle and your back knee hovering just above the ground. Push off the front foot to return to the starting position.
Benefits: Lunges work the hip muscles, thighs, and glutes, contributing to hip fat reduction and lower body strength.
C. Hip Raises (Glute Bridges)
How to Perform: Lie on your back with your knees bent and feet flat on the floor, hip-width apart. Lift your hips off the ground by squeezing your glutes and pushing through your heels. Hold for a moment at the top, then lower your hips back down.
Benefits: Hip raises target the glutes and hamstrings, helping to lift and shape the buttocks while also engaging the hip muscles.
D. Leg Lifts
How to Perform: Lie on your side with your legs straight. Lift your top leg as high as you can without bending it at the knee, then lower it back down.
Benefits: Leg lifts focus on the outer hip muscles and can help tone and sculpt this area.
E. Cardiovascular Exercises
Running, Walking, Cycling: Engaging in cardio workouts helps burn overall body fat, which includes fat stored in the hips. Aim for at least 150 minutes of moderate-intensity cardio exercise per week.
Lifestyle Changes to Reduce Hip Fat
Achieving and maintaining a leaner hip area requires more than just exercise; it involves adopting healthier lifestyle habits that support your fat reduction goals. In this section, we’ll explore key lifestyle changes you can make to effectively reduce hip fat and improve your overall well-being:
A. Stress Management
Incorporate mindfulness techniques, such as meditation and deep breathing exercises, into your daily routine to reduce stress levels. Lowering stress can help prevent excess cortisol production, which can lead to hip fat accumulation.
B. Adequate Sleep
Aim for 7-9 hours of quality sleep each night by maintaining a consistent sleep schedule. Quality sleep supports hormonal balance, which is essential for weight management.
C. Reduce Sedentary Behavior
Avoid prolonged sitting or inactivity. Take short breaks to stand, stretch, or walk around, especially if you have a sedentary job. Consider a standing desk or a stability ball chair to engage your core and hip muscles while working.
D. Hydration
Drinking an adequate amount of water throughout the day helps maintain metabolism and supports overall health. Sometimes, thirst can be mistaken for hunger, leading to unnecessary snacking.
E. Healthy Eating Habits
Focus on a diet rich in fruits, vegetables, lean proteins, and whole grains. Avoid or limit processed foods, sugary drinks, and excessive saturated fats. Be mindful of portion sizes to avoid overeating. Use smaller plates and practice intuitive eating, listening to your body’s hunger and fullness cues.
F. Limit Alcohol Consumption
Excessive alcohol consumption can contribute to hip fat accumulation due to its high-calorie content and impact on metabolism. Limit your alcohol intake or opt for healthier beverage choices.
G. Caffeine Intake
While caffeine can boost metabolism, excessive consumption may lead to increased stress and disrupted sleep. Consume caffeine in moderation and be mindful of its effects on your body.
H. Regular Physical Activity
Maintain a regular exercise routine that includes both cardiovascular workouts and strength training exercises to burn calories and tone your hip area. Mix up your workouts to prevent plateaus and keep your body challenged.
Summary
Effectively reducing hip fat necessitates a thorough understanding of the contributing factors. These factors include dietary habits like high-calorie intake and unhealthy fats, which can promote fat storage in the hip area. Sedentary lifestyles and a lack of strength training can hinder fat reduction, while hormonal changes, such as those during menopause or due to imbalanced hormones, may lead to increased hip fat. Chronic stress and insufficient sleep can further exacerbate the issue by triggering cortisol release and disrupting appetite-regulating hormones. Addressing these factors through dietary adjustments, physical activity, stress management, and adequate sleep is essential for effective hip fat reduction.
Supplementing Your Efforts to Reduce Hip Fat
While a balanced diet and regular exercise are the cornerstones of any successful hip fat reduction plan, some individuals may consider supplements to complement their efforts. It’s important to note that supplements should never be a replacement for a healthy lifestyle, and their effectiveness can vary from person to person. Before incorporating any supplements into your routine, consult with a healthcare professional to ensure they are safe and suitable for you. Here are some supplements that are commonly associated with hip fat reduction
A. Omega-3 Fatty Acids
Sources: Omega-3 supplements are often derived from fish oil, krill oil, or algae.
Benefits: Omega-3 fatty acids have anti-inflammatory properties and may help with weight loss and reducing visceral fat, including that around the hips.
B. Green Tea Extract
Sources: Green tea extract supplements contain concentrated amounts of beneficial compounds found in green tea.
Benefits: Green tea extract is believed to boost metabolism and promote fat oxidation, potentially aiding in hip fat reduction.
C. Conjugated Linoleic Acid (CLA)
Sources: CLA is found naturally in meat and dairy products, but supplements provide a concentrated form.
Benefits: CLA supplements have been studied for their potential to reduce body fat, including in the hip area, and may support lean muscle mass.
D. Protein Supplements
Sources: Protein supplements can include whey protein, casein protein, or plant-based protein sources.
Benefits: Adequate protein intake is crucial for muscle maintenance and repair. Protein supplements can help you meet your protein needs, especially if you have difficulty doing so through diet alone.
E. Fiber Supplements
Sources: Fiber supplements contain soluble or insoluble fibre, which can aid in digestion and promote a feeling of fullness.
Benefits: Fiber supplements may help control appetite and reduce overall calorie intake, indirectly supporting hip fat reduction.
Tracking Progress in Your Hip Fat Reduction Journey
Measuring and monitoring your progress is a crucial aspect of achieving your goal of reducing hip fat. By tracking your efforts, you can stay motivated, identify what’s working, and make necessary adjustments to your plan. Here are some effective ways to track your progress:
A. Body Measurements
Regularly measure your hip circumference using a measuring tape. Record these measurements in a journal or on a tracking app to see changes over time.
Take progress photos from multiple angles to visually track changes in your hip area. Compare these photos regularly to assess improvements.
B. Scale Weight
While scale weight alone is not a perfect measure of hip fat reduction, it can provide valuable insights. Weigh yourself consistently at the same time of day and under the same conditions (e.g., after waking up and using the restroom).
Look for trends in weight changes over weeks or months rather than daily fluctuations.
C. Fitness Progress
Keep a fitness journal to log your exercise routines, including the type, duration, and intensity of workouts.
Track improvements in your strength and endurance, which can indicate progress in muscle development and fat loss.
D. Nutrition Diary
Maintain a food diary to record what you eat and drink each day. Include portion sizes and details about meals and snacks.
Use apps or websites to help you track calorie intake and macronutrient distribution. This can help you stay accountable for your dietary goals.
E. Clothing Fit
Pay attention to how your clothing fits. Changes in the way your clothes fit around your hips can be a positive indicator of fat loss and improved body composition.
F. Energy Levels and Well-Being
Note changes in your energy levels, mood, and overall well-being. Feeling more energetic and positive can be an indirect measure of your progress.
G. Consistency and Goals
Set specific, measurable, and achievable goals for your hip fat reduction journey. Track your progress toward these goals to stay motivated.
Monitor your consistency in following your exercise and nutrition plan. Consistency is often the key to success.
H. Consult a Professional
Consider working with a personal trainer, nutritionist, or healthcare provider who can help you track your progress accurately and provide expert guidance.
Summary
Measuring and monitoring your progress in reducing hip fat is essential for staying on course and achieving your goals. Tracking methods include recording your hip measurements and taking progress photos to visually assess changes. While scale weight can offer insights, it should be viewed in the context of trends over weeks or months. Maintaining a fitness journal helps log exercise routines and strength gains. Keeping a nutrition diary aids in monitoring dietary choices and portion control. Pay attention to clothing fit, energy levels, and mood improvements as indirect indicators of progress. Consistency and goal setting are crucial, and seeking professional guidance can provide accurate tracking and expert support throughout your journey.
HealthifyMe Suggestion
Hip fat reduction can be an important aspect of the health journey for many. It may lead to a pear-shaped body which means having a higher hip circumference as compared to the abdomen. There are many factors that are involved in hip fat reduction like stress management, a balanced diet, regular physical activity, hydration, etc. Apart from all of these factors, it is very important that you are sleeping well and have low to moderate stress levels. Lower body fat accumulation in excess can even indicate cortisol fat.
Before working on any approach try introspecting what could be the reason for this and then target the major reasons one by one.
Conclusion
In conclusion, the journey to reducing hip fat is not only about aesthetics but also about improving your overall health and well-being. By understanding the factors contributing to hip fat accumulation, making strategic lifestyle changes, and incorporating effective exercises, you can make significant progress toward your goal. Remember that sustainable results take time, and patience is key.
Tracking your progress through measurements, photos, and other methods can help you stay motivated and make necessary adjustments to your plan. Additionally, consulting with professionals when needed, such as personal trainers or nutritionists, can provide valuable guidance and support.
Ultimately, reducing hip fat is not a one-size-fits-all endeavour. Tailor your approach to your individual needs and preferences, and focus on long-term health and fitness rather than quick fixes. With dedication and the right strategies in place, you can achieve a leaner and healthier hip area, boosting your confidence and overall quality of life.
Disclaimer: The purpose of this article is just to disperse knowledge and raise awareness. It does not intend to replace medical advice from professionals. For further information please contact our certified nutritionists Here
Frequently Asked Questions (FAQs)
Can I spot-reduce hip fat with specific exercises?
While targeted exercises can help tone and strengthen the hip area, spot reduction of fat is not generally effective. To reduce hip fat, focus on overall fat loss through a combination of exercise and a balanced diet.
How long does it take to see results in hip fat reduction?
The timeline for seeing results varies among individuals and depends on factors like genetics, diet, and exercise consistency. It’s common to start noticing changes in a few weeks, but significant results may take several months.
What’s the most effective cardio exercise for hip fat reduction?
Any cardiovascular exercise that raises your heart rate, such as running, cycling, or brisk walking, can contribute to overall fat loss, including hip fat. The key is consistency and combining cardio with a healthy diet.
Are there specific foods that target hip fat?
No single food can specifically target hip fat. A balanced diet that includes lean proteins, whole grains, fruits, vegetables, and healthy fats is essential for overall fat reduction.
Is it necessary to do strength training to reduce hip fat?
Strength training is beneficial for building muscle, which can boost metabolism and contribute to fat loss. Including strength exercises in your routine can help you achieve more comprehensive results.
Can supplements alone help reduce hip fat?
Supplements should not be relied upon as the primary method for hip fat reduction. They can support your efforts, but a healthy diet and exercise regimen should be the foundation of your strategy.
How do hormones affect hip fat?
Hormonal changes, such as those during menopause or due to imbalanced hormones, can lead to increased fat storage in the hip area. Managing hormones through a balanced diet and lifestyle choices is crucial for addressing this issue.
What’s the role of genetics in hip fat distribution?
Genetics can influence where your body tends to store fat. Some individuals may naturally store more fat in their hip area, while others may accumulate it elsewhere. However, lifestyle factors still play a significant role in managing hip fat.
Can stress impact hip fat accumulation?
Yes, chronic stress can lead to the release of cortisol, a hormone associated with fat storage, including in the hip and abdominal regions. Managing stress through relaxation techniques can be helpful in reducing hip fat.
How often should I measure my progress when reducing hip fat?
It’s recommended to measure your progress every few weeks or monthly to track changes effectively. Daily or weekly measurements can sometimes show minor fluctuations that may not accurately reflect your overall progress.
The post How to Reduce Hip Fat: A Comprehensive Guide appeared first on Blog – HealthifyMe.
Top Home Gym Flooring Choices for Carpet, Concrete, and Beyond (2023)
Whether you’re on the cusp of starting your home gym or worried about your equipment’s lifespan due to your lack of proper flooring, you’re not alone. And while aesthetics certainly play a part, the wrong flooring can be a serious hazard. It can damage your gym equipment or your floor, or worse, increase your risk of injury.
Before starting my home gym, I spent hours researching and sifting through several options, trying to find the best home gym flooring that could withstand heavy weights, high-intensity cardio workouts, and everything in between.
This article compiles that exhaustive research, coupled with my experience training on different types of flooring in commercial gyms, to guide you through the maze of choices and help you invest in a flooring solution that’s right for you.
How We Chose the Best Home Gym Flooring
We chose the best home gym flooring options by doing a careful analysis of various factors. It was important to us that we give many options based on different exercise styles, including bodyweight training, yoga, CrossFit, and powerlifting.
We also wanted to make sure our choices reflected a range of budgets to accommodate those who want the best value. That said, we included some higher-end brands (like Second Skin) for those who are willing and able to pay more for higher quality and more durability.
Finally, we made sure to include different types of flooring for the many home workout environments that home gym owners would have (concrete, carpet, and hardwood) to ensure the list represents the best options out there.
Our Top Picks for the Best Home Gym Flooring
- Best Home Gym Flooring Overall: Rubber Flooring Inc. 8mm Strong Rubber Roll
- Best Rubber Flooring for Home Gyms: Second Skin Stomp Roll
- Best Home Gym Flooring Over Concrete: Rogue Power Platform
- Best Home Gym Flooring Over Carpet: Second Skin Stomp Mat
- Best Home Gym Flooring Over Hardwood: REP Fitness Floor Mat
- Best Budget Home Gym Flooring: Tractor Supply Co Stall Mats
- Best Interlocking Tile Flooring for Home Gyms: ProsourceFit Exercise Puzzle Mat
- Best Carpet Tile Home Gym Flooring: Five Diamond Feather Peel and Stick Carpet Tiles
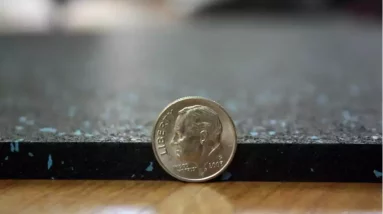
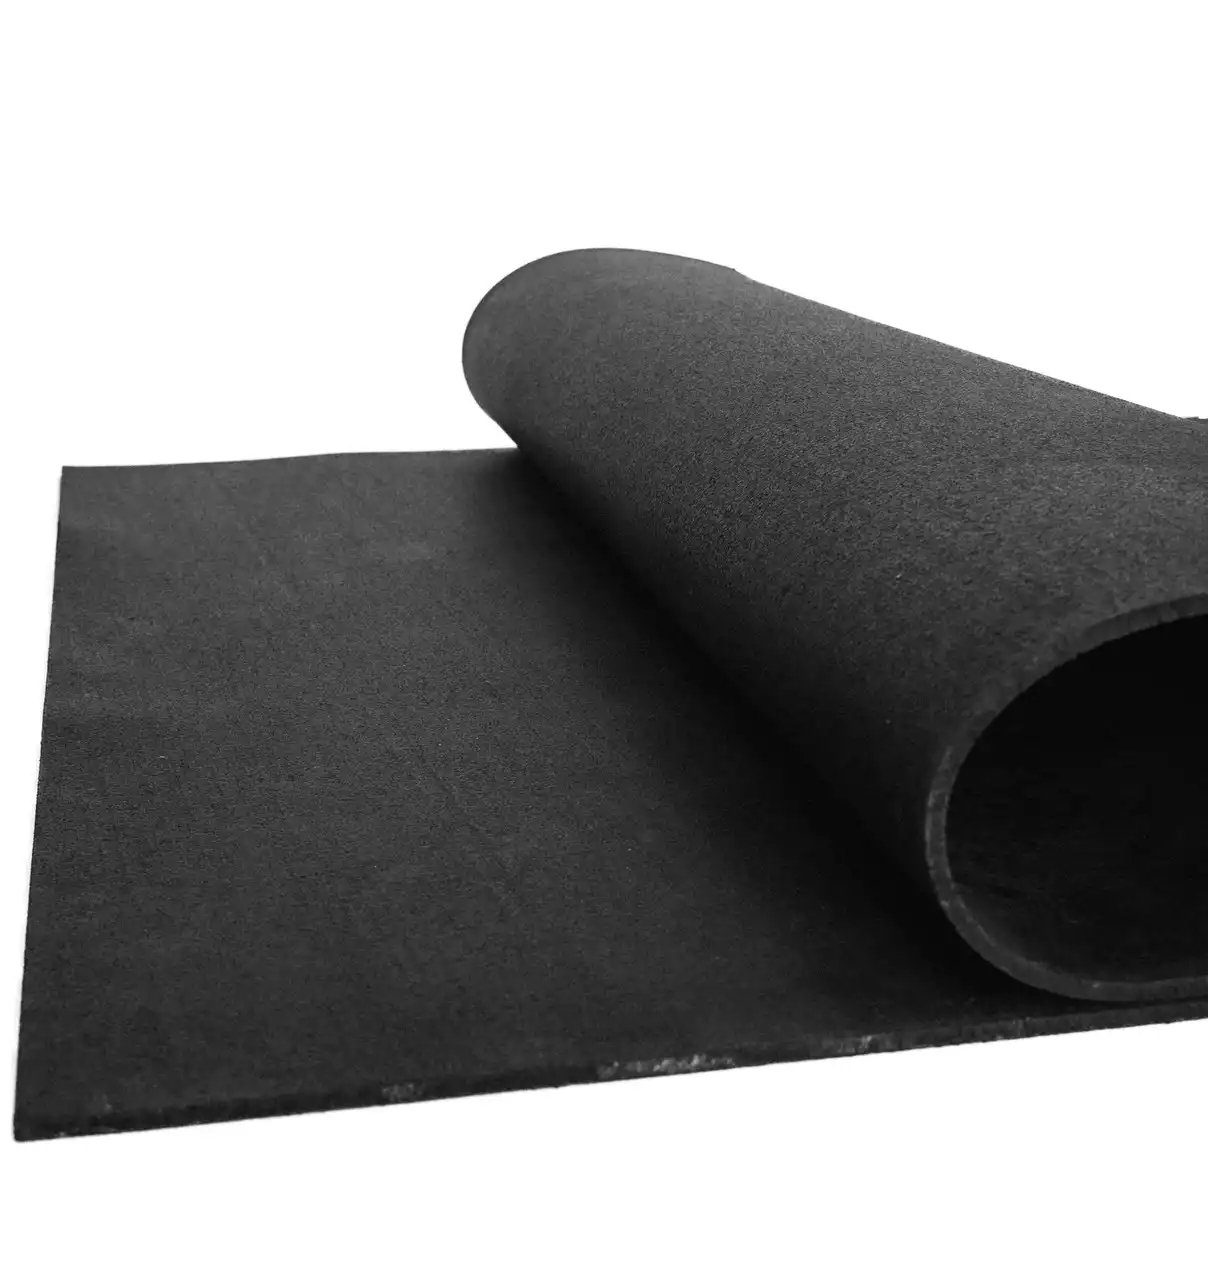
Best Home Gym Flooring Overall: Rubber Flooring Inc. 8mm Strong Rubber Roll
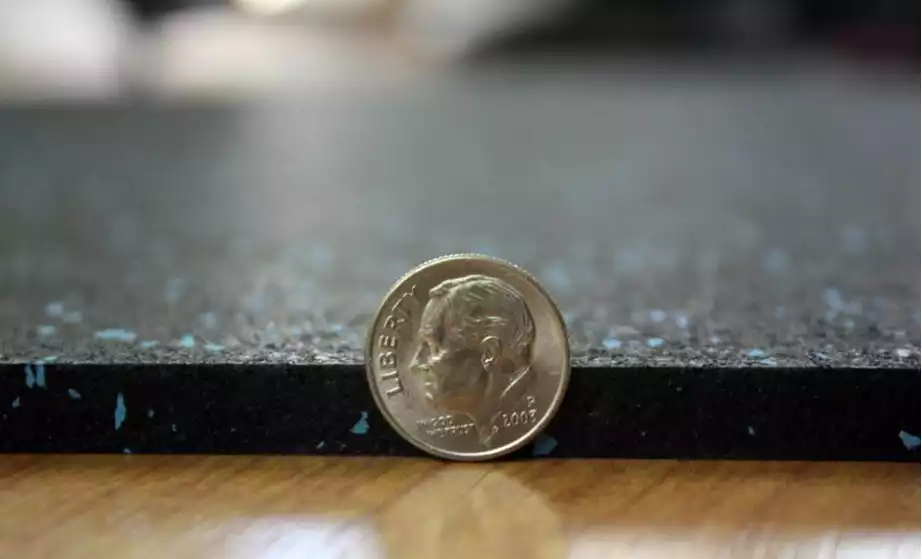
Rubber Flooring Inc. 8mm Strong Rubber Roll
- Material: Recycled rubber buffings
- Dimensions: 4′ W x 15′ to 100′ L
- Thickness: Eight millimeters (5/16 inch)
- Suitable for: General weight training, HIIT
Check Price
Pros
- Free custom-cutting to any length over 15 feet (rounded to the nearest foot) with 20 color fleck variations available
- Five-year warranty on standard color options and a 25-year warranty on the Biggie Smallz
 colors
- 30-day money-back guarantee
- USA-made
- Eco-friendly and made mostly from recycled rubber materials
Cons
- May have a rubber odor when it first arrives
- DIY installation may be challenging for some
- The rolls may curl or shift slightly over time
When it comes to outfitting your space with the best home gym flooring, the Rubber Flooring Inc. 8mm Strong Rubber Roll stands out as the ideal choice.
Unlike most flooring rolls that come in preset increments only (like 15, 50, or 100 feet), the 8mm Strong Rubber Roll can be ordered in one-foot increments starting at 15 feet. If your space is precisely 17 feet in length, for example, you can order that exact amount. Rubber Flooring Inc. will even custom-cut it for free and give you a couple of extra inches on each roll just in case.
This feature is underrated. With other companies, custom cuts aren’t available at all, so you’d be forced to buy a single 15-foot roll and leave two feet of your floor incomplete, or pay for two 15-foot rolls to cover the entire workout space just to be stuck with a bunch of leftover material.
The roll is available in 20 different color variations, from classic Black to Lipstick Red, so you can add some pizzazz to your rubber gym flooring.
The 8mm Strong Rubber Roll is made in the USA, which is appealing to those who want to support the American economy and value the higher standards that American manufacturing must meet. Rubber Flooring Inc. offers a five-year warranty on standard colors and an impressive 25-year warranty on its Biggie Smallz colors, which is one of the best warranties I’ve ever come across for rubber gym flooring. Plus, the company offers a 30-day money-back guarantee for customers in the United States and Canada.
It will most likely emit a rubber odor at first since it’s mostly made from recycled rubber. The smell can be unpleasant, but to reduce it, you can air out the rubber roll and/or clean it with a mild soap and water solution before installation.
The installation might be a hurdle if you have no DIY experience. I did find the video in the company’s “Install Info” helpful, but you’ll still need a good understanding of how to use basic tools (measuring tape, t-square, and utility knife) and fundamental construction principles. If you have no experience in this field, calling a professional would be a smart decision.
Lastly, the rubber roll may curl or shift slightly over time with drastic temperature changes or if heavy things get dragged across it — like a fully loaded bumper plate tree. To prevent this, you can use double-sided tape to secure the rubber roll sticks to the floor.
Best Rubber Flooring for Home Gyms: Second Skin Stomp Roll
Second Skin Stomp Roll
- Material: Recycled rubber
- Dimensions: 4′ W x 15′, 25′, or 50′ L
- Thickness: ¼ inch, eight millimeters, ⅜ inch, ½ inch, or ¾ inch
- Suitable for: General fitness, HIIT, powerlifting, and Olympic weightlifting
Check Price
Pros
- Five thicknesses that are suitable for low- to high-impact activities
- Includes noise-reducing technology
- Has a mild odor
- USA-made
- Made from recycled rubber materials
Cons
- Only available in black
- Custom cuts cost extra
- DIY installation may be difficult
If you are looking for rubber flooring that can reduce noise and vibration from your home gym equipment, you may want to consider the Second Skin Stomp Roll.
Second Skin is originally known for auto and audio soundproofing, but many of its products are also used in gyms due to their excellent noise and vibration dampening. This distinctive feature makes the Stomp Roll a solid choice for home gyms where quieter workouts are essential due to shared living spaces or the sleep schedules of young children.
With five different thicknesses to choose from, you’re almost guaranteed to find one that’s suitable for your exercise style. The quarter-inch thickness is great to place under any of the best treadmills or for bodyweight training, while the ¾-inch thickness is ideal for general weight training and HIIT. If powerlifting, CrossFit, or Olympic weightlifting is more your style, the ¾-inch thickness can provide enough protection for your floor when placed on top of plywood like on a lifting platform.
Despite being made from old tires, the Stomp Roll’s product page claims an “extremely mild odor.” I can’t confirm the strength of its smell but if true, this is a significant advantage over the many rubber flooring options that tend to off-gas unpleasant odors for weeks after installation. For those with asthma or other respiratory conditions (even just a sensitivity to scents in general), having near-odorless flooring can make a difference.
If adding flair to your rubber gym flooring is important to you, you’ll be disappointed to see that the Stomp Roll is only offered in black.
Furthermore, unlike the Rubber Flooring Inc 8mm Strong Rubber Roll mentioned previously, custom cuts of the Stomp Roll cost extra. Custom lengths are “available on request” and one customer even left a review saying, “I had a very custom project… They cut my pieces exactly as I asked for at a very fair price!”
While it’s great to know that you can get custom lengths other than the default 15-, 25-, and 50-foot lengths, I would be more impressed to see them offered at no extra charge.
The Stomp Roll’s installation process is simple but requires some basic DIY skills and understanding. If you’re not comfortable with self-installation, help from a professional may be necessary but will add to the overall cost. Keep this in mind, especially if you prefer a hassle-free setup.
Best Home Gym Flooring Over Concrete: Rogue Power Platform
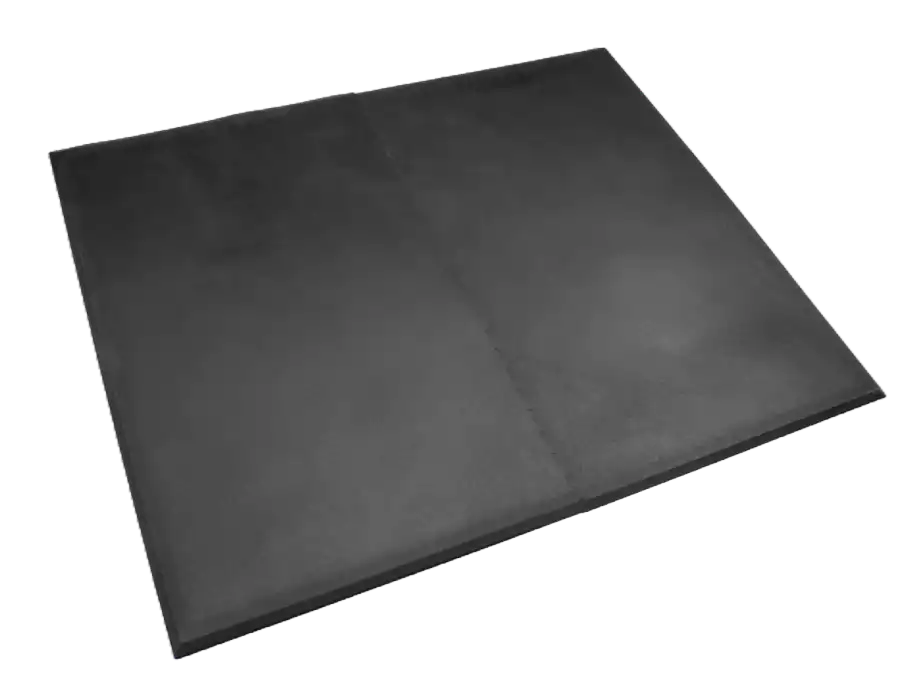
Rogue Power Platform
- Material: Recycled rubber
- Dimensions: 90” W x 72” L
- Thickness: ¾ inch (19 millimeters)
- Suitable for: General weight lifting, HIIT, CrossFit
Check Price
Pros
- The diamond-pattern top gives a good grip even when slick
- Can be used indoors or outdoors
- The ¾-inch thickness and waffle-pattern impact zones minimize noise and vibrations
- Easy installation due to the interlocking design
- Made in the USA
- Eco-friendly
Cons
- The fixed size might not suit all gym spaces and trimming it might damage the interlocking mat system
- Expensive compared to budget-friendly alternatives
- Potentially unstable with extremely heavy weights
The Rogue Power Platform is an excellent flooring choice for anyone with a concrete floor because of its durable rubber construction and waffle-pattern impact zones. The diamond-pattern top layer also gives it a better grip even in slick conditions, which is great for those who might prefer to have their home gym outside and work out in humid conditions.
RELATED: The Dangers of Outside Workouts
The ¾-inch thickness provides serious durability, making it ideal for general weight lifting, HIIT, and CrossFit. The waffle-pattern impact zones dampen noise and vibrations, which helps keep your concrete floor protected and your neighbors happy.
While it might seem extra-wide, the 90-inch width ensures that every weight plate on your favorite Olympic barbell will be supported with three inches on each side to account for occasional sideways movement. The default 72-inch length is surprisingly roomy and can accommodate two barbell setups for you and your workout partner when doing controlled exercises like deadlifts or rows.
The mats feature a modular, loose-lay interlocking system and sections with beveled edges. Installation is fairly straightforward with no adhesive required. For those not super DIY knowledgeable, this is a big relief.
However, its 72″ x 90″ footprint may not suit all spaces, and trimming it might damage the interlocking mat system.
If you’re into Olympic lifting, the Power Platform isn’t the best choice. At 72” long, this is the minimal length you should accept for weightlifting. While it technically could work, your feet could land beyond the perimeter of the platform during a split jerk if you have long legs. In the event of a bailed lift, it’s only a matter of time before a failed snatch or clean and jerk lands off the platform and damages your floor. A better option for Oly lifting is the Rogue 8′ x 8′ Oly Platform.
The Power Platform is also more costly at $399 compared to budget-friendly alternatives like 4′ x 6′ horse stall mats from Tractor Supply, where a single mat can be found for around $60. Two horse stall mats would total roughly $120 and, when joined together, would offer a bigger platform for less than half the cost.
Finally, the platform might be less stable with ultra-heavy weights due to the rubber material. After all, there’s a reason why lifting platforms usually have a centerpiece made out of wood — it’s more firm than a rubber surface. While this would probably be unnoticeable with light to moderate weights, it’s worth pointing out for those who want to lift heavy.
Best Home Gym Flooring Over Carpet: Second Skin Stomp Mat
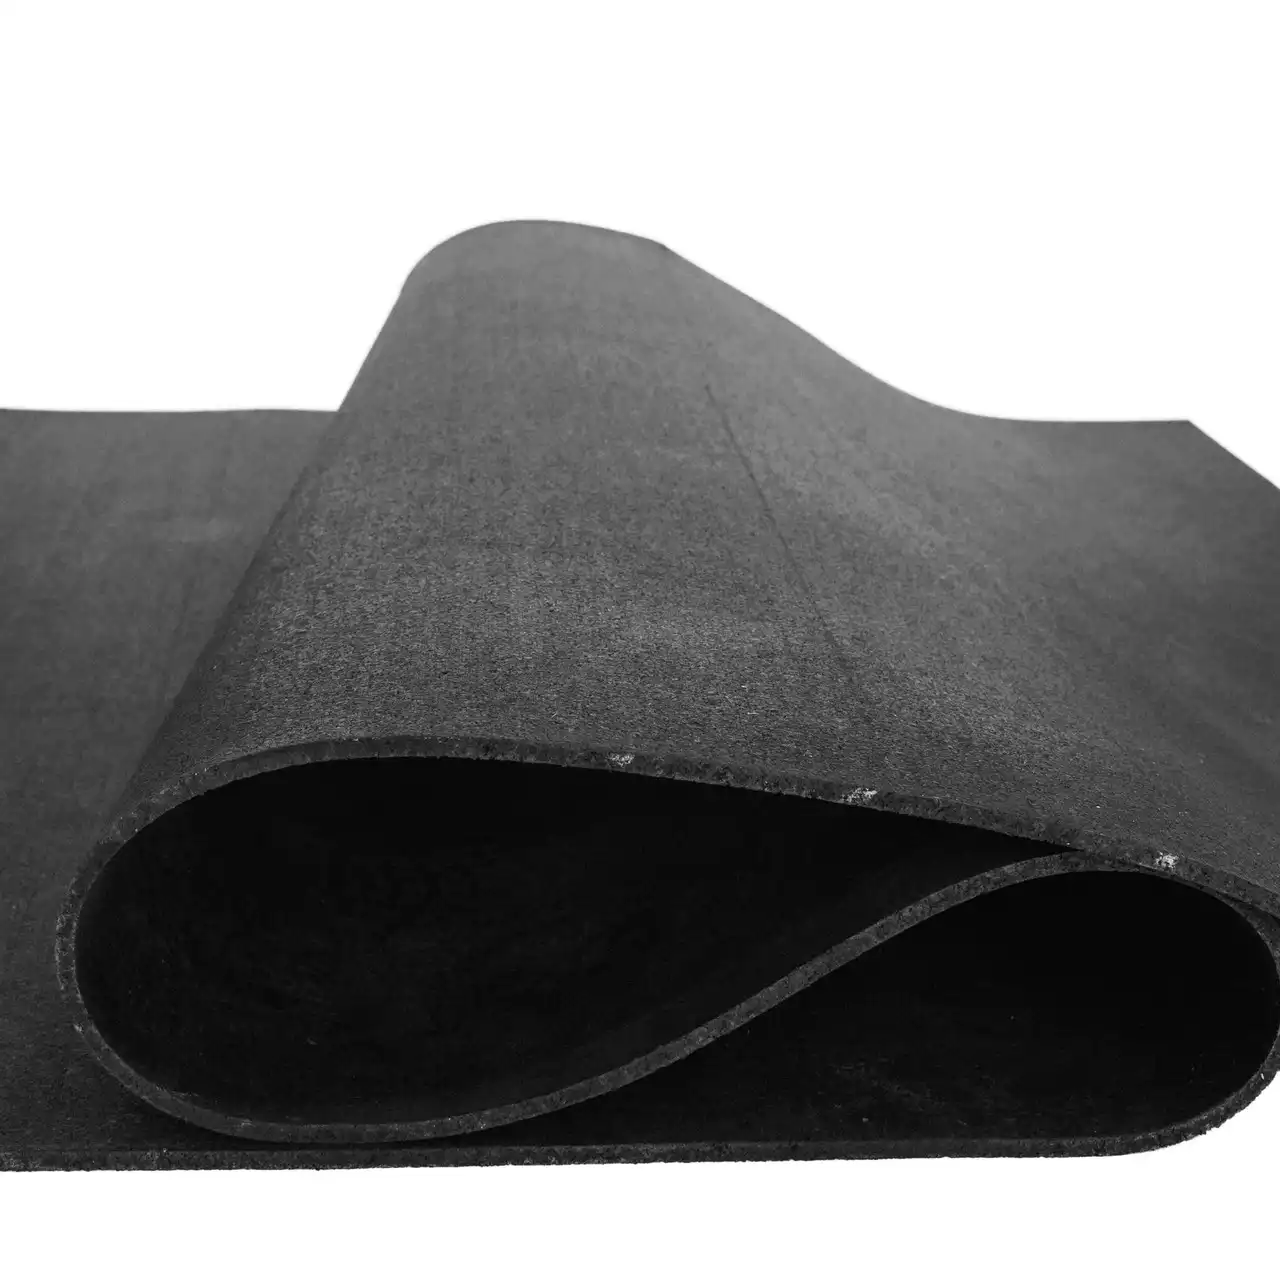
Second Skin Stomp Mat
- Material: Recycled rubber
- Dimensions: 4′ W x 6′ L
- Thickness: ¼ or ½ inch
- Suitable for: Bodyweight training, general weight lifting, HIIT
Check Price
Pros
- Shock-absorbing properties to protect your floor from damage, whether it’s from a treadmill or barbell
- Includes noise-reducing technology
- Installation is a breeze
- No adhesive needed
- USA-made
- Eco-friendly
Cons
- No ¾-inch thickness
- Costly
- Even when weighed down by heavy equipment, these mats can shift slightly over time
The Stomp Mat offers several advantages that make it the most appealing choice and the best home gym flooring option to place over carpet. With its shock absorption capabilities, it safeguards your carpet fibers from getting torn up while also protecting your existing subfloor from damage.
The ¼-inch mat weighs 30 pounds (13.6 kilograms) and provides excellent noise reduction, making it a great option for supporting standalone exercise equipment like a high-quality rowing machine or treadmill. The weight of the machine on top of the mat tends to keep it in place. The ½-inch thick mat, on the other hand, weighs 60 pounds (27.3 kilograms) and offers even more sound isolation and flooring protection.
The Stomp Mat lacks a ¾-inch thickness option. This limits its suitability for powerlifting-style training because it may not be able to handle significantly heavier weights. It’s also not a great choice for Olympic lifting or CrossFit because the thinner options won’t be able to withstand repeated weight drops from overhead.
Additionally, it’s relatively costly compared to budget options. The ¼-inch mat is priced at around $99.99, and the ½-inch mat costs around $179.99. A ¾-inch horse stall mat from Tractor Supply Co. costs about $60, offering more thickness at a lower price.
Because it’s a mat instead of a roll, installation is a breeze. Simply lay it over your carpet, and place your equipment on top or get lifting.
You technically don’t need adhesive, but double-sided flooring (carpet) tape or rubber adhesive applied around the edges of the mat is a wise choice. Even when weighed down by heavy-duty cardio machines, these mats can shift slightly over time. If using multiple mats, you can also place mending plates under the mats where their seams join to keep them from separating over time.
Best Home Gym Flooring Over Hardwood: REP Fitness 3′ x 4′ Floor Mats
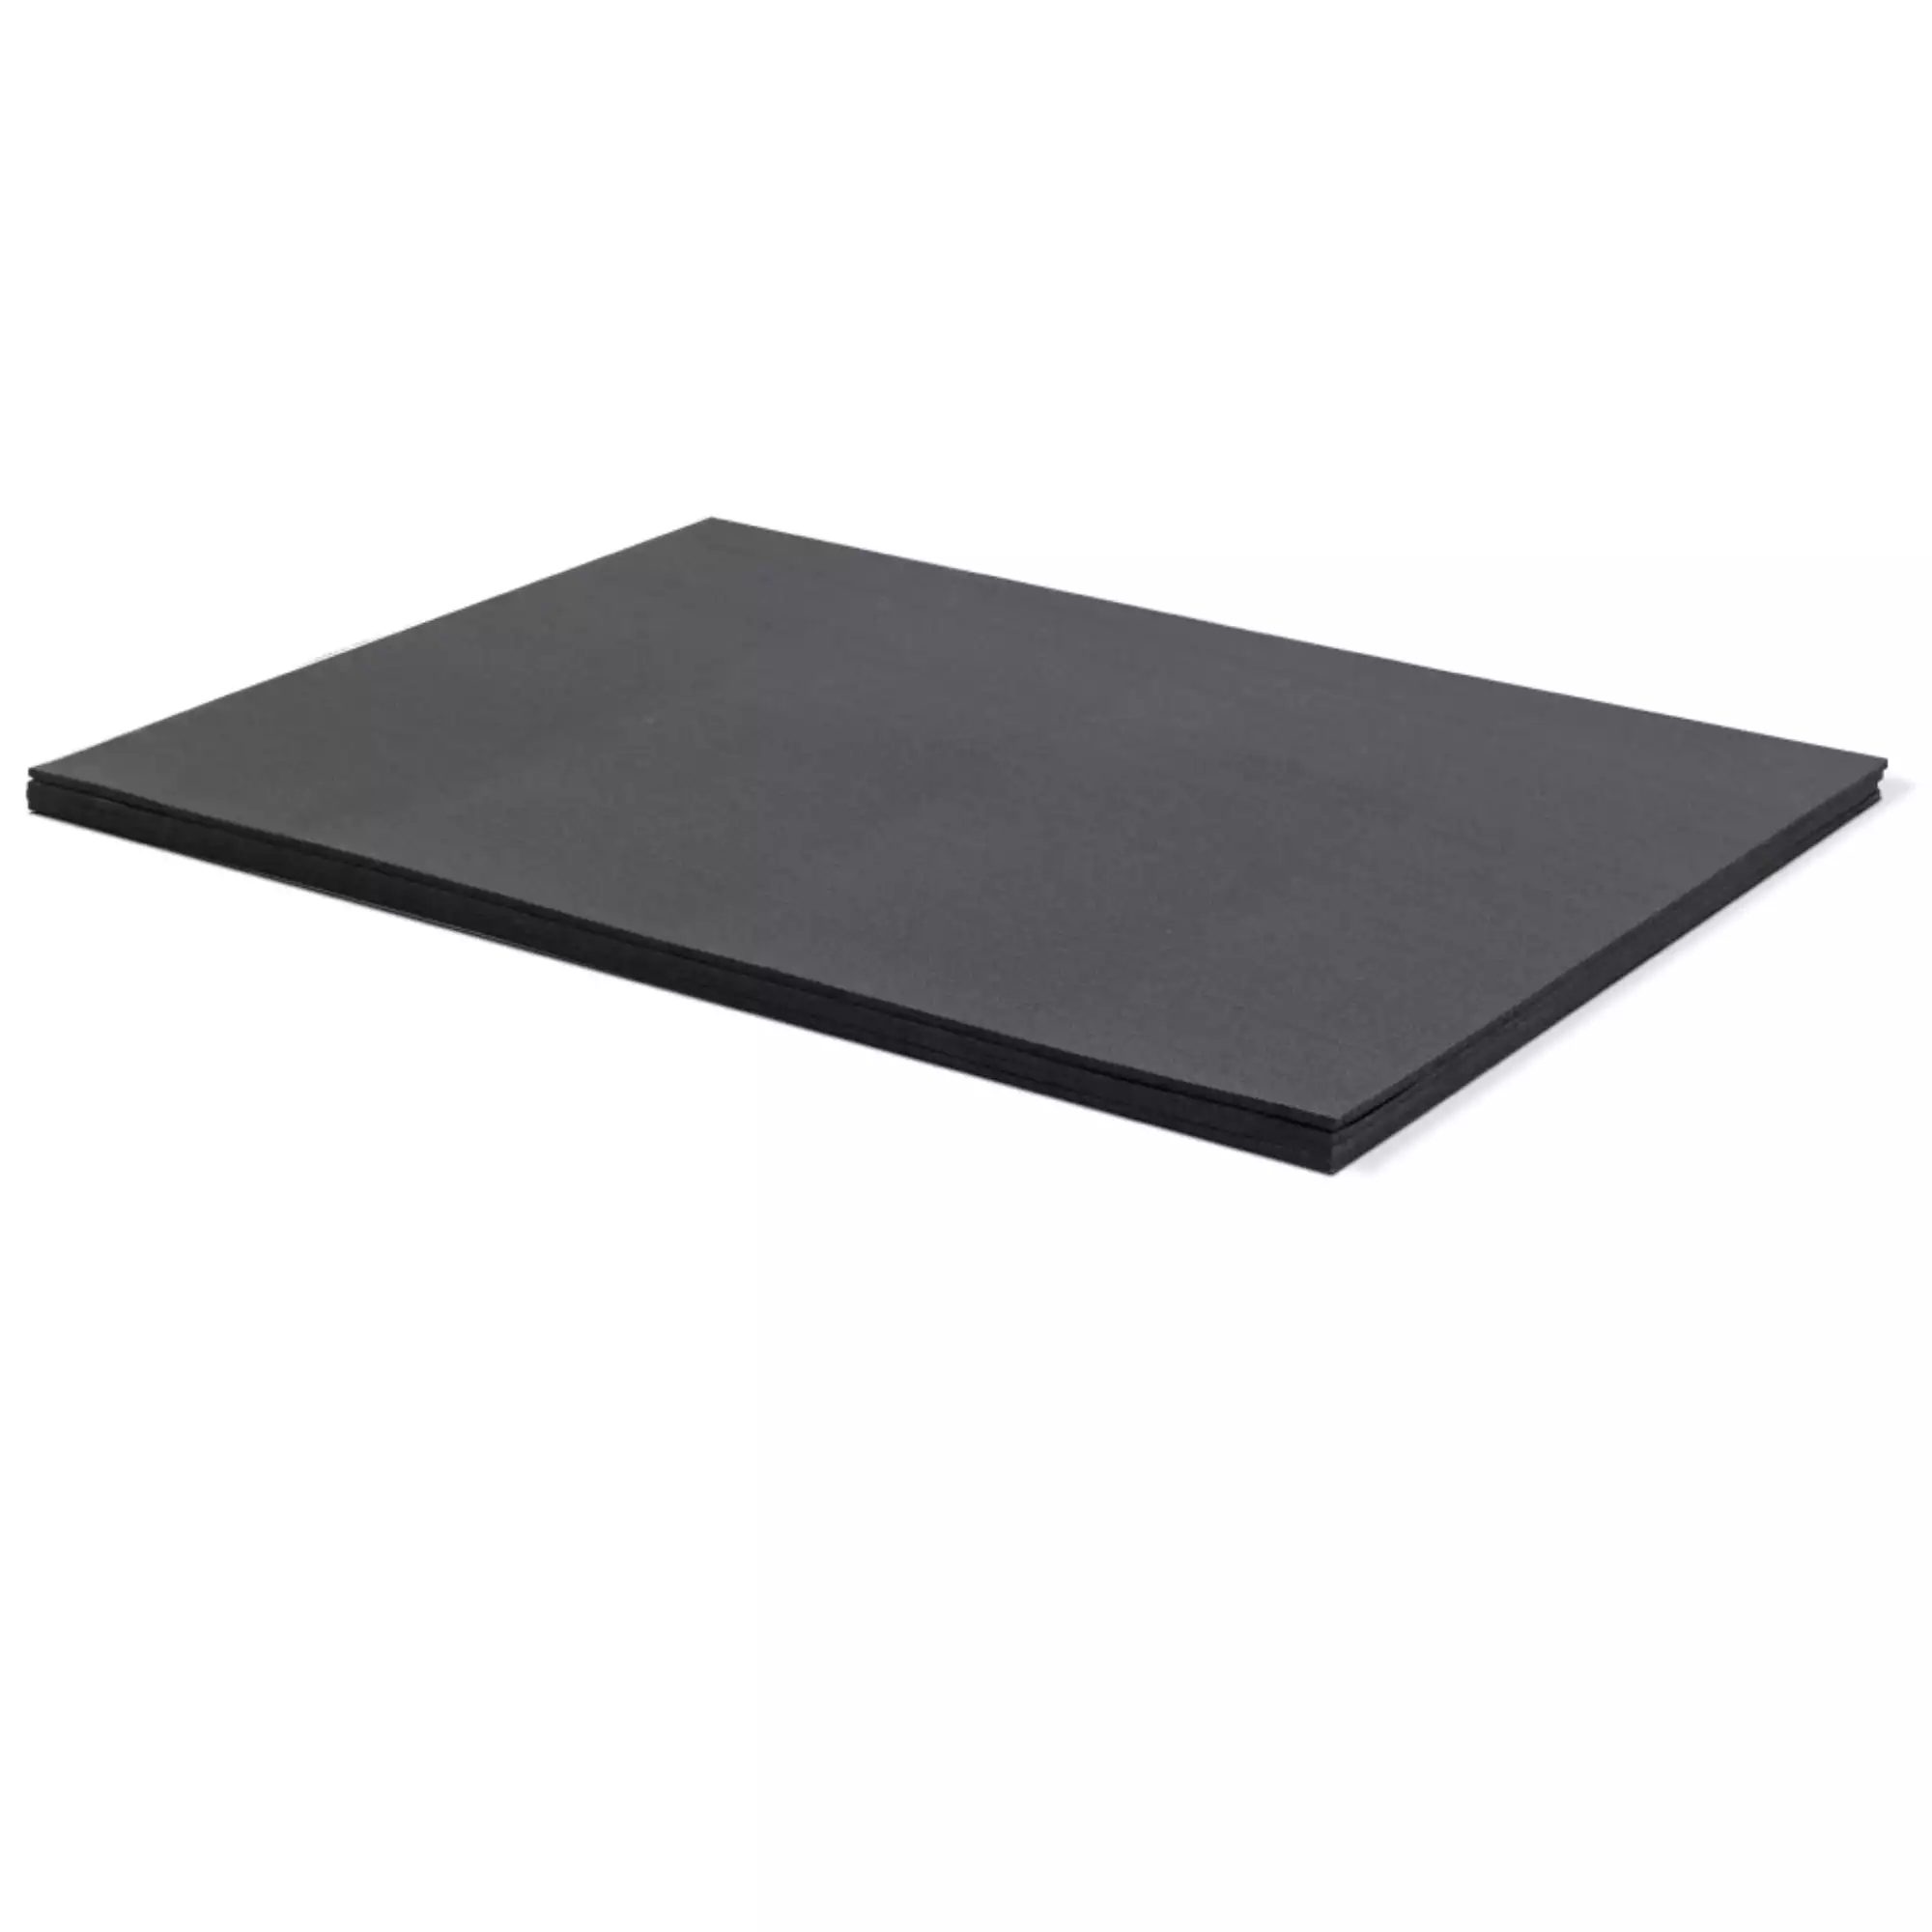
REP Fitness Floor Mats
- Material: Rubber
- Dimensions: 3′ W x 4′ L
- Thickness: ⅜ inch
- Suitable for: General weight training, HIIT
Check Price
Pros
- Smooth top makes floor exercises like sit-ups and push-ups more comfortable
- Textured bottom helps prevent the mats from slipping
- ⅜” thickness can help protect your hardwood floors from general weight training
- No odor
- USA-made
Cons
- The mats have a ½-inch tolerance, so small gaps between mats can happen
- Roughly the same cost as horse stall mats, but only half the size
- Not thick enough to protect your floors from heavy lifts or dropped bars.
The biggest feature that stands out to me with the REP Fitness 3′ x 4′ Floor Mats is the non-grooved, textured bottom. Horse stall mats have slots or grooves on the underside for improving drainage. This is great for livestock and industrial applications but serves very little purpose in a home gym. Instead, a fully flat underside lets the entire mat have complete contact with your floor. In addition to the textured underside on REP’s floor mat, this combo ensures that the mat doesn’t slip, and we think this makes it the best choice to put over your hardwood floor.
REP Fitness went a step..

Can Late-Night Snacking Lead to Weight Gain?
If you’re cooking a late dinner or often feel snackish before bedtime, you may wonder, “Does eating at night make you gain weight?”
Short answer: When you eat is not as important as what you eat or how much you consume. Your body doesn’t store more fat at night, and your metabolism does not slow down in the evening hours.
“In general, there’s no set cutoff for eating food,” says Krista Maguire, R.D., C.S.S.D., senior nutrition manager for BODi. But you do still need to choose healthy snacks and be mindful of portions.
Before you reach for that midnight snack, here’s what you need to know about late-night eating and weight gain.
Busting the “Eating Late Causes Weight Gain” Myth

There’s a long-held belief that eating after a certain hour contributes to weight gain, but that may not be entirely accurate.
A 2011 study compared two groups of participants. One group followed a conventional weight-loss diet, while the other group consumed most of their carbohydrates at dinner.
The surprising results: Over the course of the six-month study, the group that ate the carb-heavy dinner reported greater weight loss and body fat mass reductions.
And more research suggests the “eat late, gain weight” adage applies to large quantities of food, but not to small meals consisting of nutrient-dense foods.
“If you’ve already consumed a large amount of food during the day, late-night eating may just be excess calories that could lead to weight gain,” Maguire says. “This is especially true if you’re consuming foods with no nutritional value — think potato chips, soda, or candy.”
But if you’re eating mindfully, Maguire adds, there can definitely be some benefits to eating at night.
A higher-protein snack with high-fiber carbs before bedtime may help reduce exercise-induced muscle soreness, prevent hunger pangs in the night, and possibly help with healthy blood sugar control.
Bottom line: “If you’re eating at night, don’t go about it mindlessly,” Maguire says. “Eat with purpose.”
Does Meal Timing Matter?

There are some potential benefits to planning your meals around when your body needs certain nutrients, a.k.a. timed nutrition. For example:
- Eating a healthy breakfast may keep you from feeling ravenous and overeating when lunchtime rolls around.
- A small pre-workout snack with 15 to 20 grams of carbohydrates — like half a banana — can give you the energy you need to power through a workout.
- Regularly timed meals throughout the day can help you maintain a healthy metabolism and energy levels.
To understand why eating late at night won’t automatically lead to weight gain, it’s important to understand how your body processes calories.
When you eat, your body works hard to convert food into the energy you need for everything from walking, thinking, breathing, building muscle, losing fat, and even sleeping. This process is known as the “thermic effect of food” (TEF).
Protein is the most metabolically expensive macronutrient — you burn up to 30 percent of the calories you eat from protein during the digestion process.
That’s one of the main reasons why protein (or taking a protein shake supplement) can be helpful for weight loss. The more protein you eat, the more calories you burn.
But there’s no clear link between meal timing and TEF.
So while you may have heard that eating first thing in the morning would lead to your metabolism working harder and burning more calories, the reality is that your body doesn’t care when or how often you eat — as long as you’re not adding excess calories.
So instead of wondering how many meals you should eat in a day and when to eat them, focus on what you’re eating and whether you’re being mindful of your portions.
Should You Eat at Night?

It depends on why you’re eating.
Many people eat at night out of boredom or because of stress or anxiety. Mindless eating and emotional eating can both turn a nighttime snack into a calorie bender.
Want a simple way to gauge whether or not you need that late-night grub?
“The true test of hunger is to ask, ‘If you could eat some veggies right now, would you?’” Maguire says. “If the answer is yes, you’re probably hungry.”
Otherwise, you may just be craving a snack or eating out of habit or boredom.
It’s also important to make sure late-night eating doesn’t interfere with your sleep habits.
Research suggests consuming carbohydrates at night may make it easier to fall asleep, but eating a big meal too close to bedtime may disrupt your sleep cycle and can lead to heartburn for some people.
That can ultimately get in the way of your weight loss goals.
Research suggests lack of sleep can torpedo weight loss by slowing your metabolism, increasing your appetite, and decreasing the number of calories you burn.
In a study at Wake Forest University, researchers found that people under 40 years of age who slept five hours or less each night gained nearly 2.5 times more abdominal fat than those who logged six to seven hours.
So if you’re a night eater, that’s fine — just make sure you’re choosing healthy foods, staying within your calorie goals for the day, and getting enough sleep each night.
The post Does Eating Late at Night Make You Gain Weight? appeared first on BODi.


5 Essential Dental Care Tips for Preschoolers to Keep Their Smiles Bright and Healthy
Preschoolers are children between the ages of three and five years old who are in the early stages of learning and development. During this stage, they are developing their primary teeth, also known as baby teeth, which will eventually fall out and be replaced by permanent teeth.
However, this does not mean that dental health should be neglected. In fact, tooth decay is the most common dental disease among preschoolers, with one out of ten two-year-olds already having one or more cavities.
As a result, it is important for parents and caregivers to be aware of dental health tips for preschoolers to prevent dental diseases and ensure their children’s overall health and well-being.
Promoting dental health in preschoolers is crucial for establishing good oral hygiene habits early on. This saves your kid from developing teeth or gum problems later in life. In this article, you will find out some dental health tips for preschoolers that you should observe for your little one.
5 Top Dental Health Tips For Preschoolers
Here are the basic dental health tips for preschoolers that you should observe on your little ones to ensure they grow with healthy teeth and gums.
1. Brush twice a day using a low fluoride toothpaste
Once your child’s first tooth erupts, brush their teeth using a soft-bristled toothbrush and a small smear of fluoride toothpaste. Brush your teeth twice a day, in the morning and before bed. You are to help them until they reach five or seven years.
Also, the method of brushing is essential for preschoolers. Brush their teeth in small circular motions, covering all surfaces. Make it a fun activity by using a timer or playing their favorite song for the duration of brushing (around two minutes), or else they will always struggle with you, especially in the early times.
However, it is advised to begin cleaning your child’s mouth even before their first tooth appears. Gently wipe their gums with a clean, damp cloth after feeding to remove bacteria.
2. Limit sugary snacks and drinks
Another essential dental health tip for preschoolers is to limit their consumption of sugary snacks and drinks. Reduce the consumption of sugary snacks and drinks, especially between meals. Excessive sugar can contribute to tooth decay. Encourage healthy alternatives like fruits, vegetables, and water.
3. Encourage drinking water
Another essential dental health tip for preschoolers is that they should be encouraged to drink tap water throughout the day. Tap water supply usually has fluoride, which will help keep their tooth from decay.
If the tap water at home is not fluoridated, talk to your dentist about fluoride supplements or treatments to help protect your child’s teeth against cavities and other dental problems that affect preschoolers.
Additionally, water helps wash away food particles and neutralize acids in the mouth. Also, for kids aged two and above, you can introduce them to plain milk as it is very healthy.
4. Eat a lot more healthy snacks and meals
Healthy snacks and meals have a role in enhancing and preserving the dental health of preschoolers. Expose the preschoolers to healthy foods such as vegetables, fruits, lean meat, grains, fish, cereals, dairy, and eggs.
Also, fruits and vegetables are good, and dairies like milk, yogurt, and cheese are good sources of calcium and are beneficial to the teeth.
Also, preschoolers watch and copy what you do as a parent. So it’s important to role model healthy eating for your children. They learn about food by watching their parents and other family members.
5. Visit the dentist regularly
Schedule regular dental check-ups for your child. The dentist can monitor their oral health, provide professional cleanings, and address concerns or issues. Every child is different, and some may require additional dental care. Consult a pediatric dentist for personalized advice tailored to your child’s needs.
Conclusion
If you want your preschooler to grow up with good oral health and healthy teeth and gums, you must observe all the health tips for preschoolers listed above. If their dental health is not managed adequately as babies and kids, they might develop complications later as young teens and adults.
The post 5 Top Dental Health Tips For Preschoolers first appeared on You Must Get Healthy.
The post 5 Top Dental Health Tips For Preschoolers appeared first on You Must Get Healthy.

Get Fit in a Flash: 8 Quick and Effective Core Exercises for Seniors
Ab workouts aren’t limited to athletes and the under-30 crowd! As a matter of fact, seniors rank as one of the top groups who should be doing core strengthening exercises regularly.
The reason? Targeting your midsection with sculpting and strengthening exercises is crucial to staying healthy and active. Your core is more than just the visible ab muscles you see on display in popular fitness magazines. It’s made up of all the muscles in your trunk, which assist in nearly every movement you make.
Here are the benefits of working your core as often as you can:
- Improves posture
- Reduces back pain
- Improves balance
- Helps with everyday activities
- Improves coordination
The following 8 moves are some of the top core exercises for older adults. Aim to do these exercises daily to keep your core muscles strong and healthy.
Perform each move for 5-10 reps (per side), and you’ll get a great core workout in less than 10 minutes.
1. Seated Forward Roll-Ups  Photo Credit: Get Healthy U
Here’s how to perform a seated forward roll-up:
- Sit in a chair with your legs extended, heels on the floor, and feet flexed towards your face. Extend your arms in front of you. Keep an upright posture; don’t slouch or lean back in the chair.
- Begin curling your chin to your chest. Exhale as you roll the entire torso up and over, keeping your legs straight, abs engaged. Reach down towards the toes.
- Once you can’t reach any further, inhale as you begin to roll back up to the starting position, one vertebra at a time.
- Repeat moving slowly. Avoid using momentum; try to use your abdominals to lift and lower.
2. Seated Side Bends  Photo Credit: Get Healthy U
Here’s how to perform seated side bends:
- Sit with knees bent and feet flat on the ground. Bend your right arm to bring your right hand to the right side of your head. Allow your left arm to hang at your side. Keep an upright posture; don’t slouch or lean back in the chair.
- Inhale. As you exhale, bend gently at the waist to lower your left arm toward the floor. Keep your chest open and pull your right elbow back to feel a stretch in your right side.
- Inhale to return to starting position. Repeat.
3. Seated Leg Lifts  Photo Credit: Get Healthy U
Here’s how to perform a seated leg lift:
- Sit in a chair. Your left knee should be bent with your left foot flat on the ground, and your right leg extended. Keep an upright posture; don’t slouch or lean back in the chair.
- Engage your core to raise your right leg. Lift your leg as high as you can without letting your back collapse. Hold briefly before returning your foot to the floor.
4. Seated Leg Taps  Photo Credit: Get Healthy U
Here’s how to perform seated leg taps:
- Sit in a chair with knees bent and feet flat on the ground. Keep an upright posture; don’t slouch or lean back in the chair.
- Hold onto the bottom of your seat for support. Engage your abdominals and extend both legs out in front of you, tapping the floor with both feet.
- Reset by pulling your legs under your chair, allowing your feet to rest on the floor. When you’re ready, repeat.
5. Seated Half Roll-Backs  Photo Credit: Get Healthy U
Here’s how to perform a seated half roll-back:
- Sit in a chair with knees bent and feet flat on the ground. Lift your arms in front of your chest to create a circle. Keep an upright posture; don’t slouch or lean back in the chair.
- Keeping your feet on the floor and your arms joined in a circle in front of your chest, begin to round your back. As you round your back, think about scooping your abdominals.
- Once you can’t go any further, engage your abs as you slowly roll back up to the starting position.
6. Forearm Plank  Photo Credit: Get Healthy U
Here’s how to perform a forearm plank:
- Lie face-down on the floor with your forearms on the ground. Your elbows should be directly under your shoulders and hands flat on the ground, elbow-width apart.
- Engage your core to prepare. Then, press down through your forearms to raise your body off the floor until you’re supported by your forearms and toes.
- Keep your body in a straight line from your head down to your feet. Pull your navel into your spine and squeeze your glutes to keep your hips from dropping toward the floor.
- Hold for 30 seconds or 1 minute if you’re more advanced. (Or as long as you can!)
Modification: Drop down to your knees if you can’t keep your hips in line with your shoulders, or you feel pressure in your lower back.
7. Superman  Photo Credit: Get Healthy U
Here’s how to perform a superman:
- Lie on your stomach with your legs long. Extend your arms overhead. Draw your abdominals up and away from the ground, and pull your shoulders down away from your ears.
- Engage your abs, back muscles, and glutes to lift your arms and legs simultaneously off the ground. Keep your gaze on the floor.
- Release back to the starting position with control.
8. Glute Bridge  Photo Credit: Get Healthy U
Here’s how to perform a glute bridge:
- Lie on your back with knees bent and feet flat on the floor, hip-width apart.
- Engage your abs and squeeze your glutes to lift your hips to a bridge.
- Hold briefly and return your glutes to the floor with control.
9 Tips For Joint Health | Keep Your Joints Healthy As You Age  Photo Credit: Shutterstock
Keeping your joints healthy is key to staying mobile and experiencing less pain as you age. Although you may not be able to prevent all joint injuries or arthritis, there are many things you can start doing today to improve your joint health!
9 Tips For Joint Health | Keep Your Joints Healthy As You Age
Power Walking For Beginners  Photo Credit: Shutterstock
With countless studies proving the health benefits of power walking, learning how to do it will keep you moving well into the future.
Power walking is one of the most maintainable workouts a person can add to their life, so if you haven’t tried it yet, how about starting now?
Power Walking For Beginners
14 Health Benefits of Cucumbers (And a Few Refreshing Recipes)  Photo Credit: Depositphotos
From healthy skin to improved memory, check out the top 14 health benefits of cucumbers!
And if you’re lucky enough to have a load from your garden or farmers market on hand, you’ll definitely want to check out some of our favorite cucumber recipes, too.
14 Health Benefits of Cucumbers (And a Few Refreshing Recipes)
