
Master the Art of Glute Kickbacks for a Bootylicious Behind
If you’ve been on board the bigger butt train, certain lower body exercises stand out. Squats, deadlifts, lunges, and hip thrusts have the center stage. But when you’re likely too tired for another set of squats, the glute kickback is ready to target your backside — without the added strain of another heavy barbell.

Here’s how this glute accessory exercise can up your gains.
How to Do the Glute Kickback
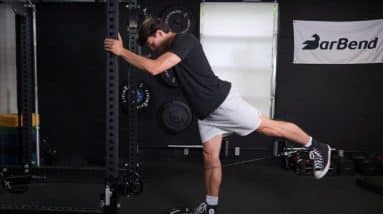
The glute kickback is a cable-based exercise that allows you to specifically target your glutes. It is performed using a few different implements or specialty pieces of equipment, but the simple cable machine serves as the standard. Here’s how to perform the glute kickback.

- Step 1 — Place the ankle strap on the cable machine carabiner and adjust its height to the lowest position
- Step 2 — With the ankle strap around your ankle, face the cable machine and lightly hinge to stabilize. Place most of your weight on the non-working leg. This is your starting position.
- Step 3 — Using your hands and free leg to brace, press into the machine to create a counterforce to your kickback. Brace your core, tighten your legs, and secure your grip on the cable machine as stability points.
- Step 4 — Keep your working leg long, with only a subtle bend at the knee. Squeeze your glute on the working side as you drive your leg backward against the resistance.
- Step 5 – Once your glute has fully contracted, slowly lower back to the starting position. Perform for repetitions.
Coach’s Tip: Start your sets with your non-dominant side, which is often your weaker side. This way, you’re setting a movement standard that you can accomplish evenly.
Glute Kickback Variations
The glute kickback is a great way to isolate your glutes as much as possible and pepper in much-needed training volume without taxing your lower back under a barbell.
If you’re searching for some variations on the glute kickback, a few great choices are the donkey kick, a machine glute kickback, or a 45-degree cable kickback.
Donkey Kick
https://www.youtube.com/watch?v=SJ1Xuz9D-ZQVideo can’t be loaded because JavaScript is disabled: Donkey Kicks (https://www.youtube.com/watch?v=SJ1Xuz9D-ZQ)
[Read More: 10 Glute Exercises You Can Do at Home]
Why Do It: This bodyweight glute exercise is a way to isolate your glutes without weight. You’ll get the added bonus of a balance challenge and solid mind-muscle connection.
Equipment Needed: You don’t need anything except yourself and possibly a yoga mat here.
- Begin in the quadruped position (on the floor on your hands and knees).
- Brace your core and tighten your back to stabilize your position.
- Squeeze your right glute, raising your right leg into the air. Lower it back down to the starting position and repeat with the left leg for repetitions.
Glute Kickback Machine
https://www.youtube.com/watch?v=NLDBFtSNhqgVideo can’t be loaded because JavaScript is disabled: Machine Glute Kickback (https://www.youtube.com/watch?v=NLDBFtSNhqg)
[Read More: Better Glutes, Better Pulls: How Should We Approach Glute Training For Powerlifting]
Why Do It: Here, you’ll have a machine to brace your body against. Take advantage and up the weight with this isolation exercise so that you can focus as much as possible on the activation of your gluteal muscles.
Equipment Needed:
- Line up in the machine with your working foot flat against the footpad and your hands or shoulders braced against the pads provided.
- Squeeze your hands and engage full body tension to provide stability.
- Drive your working leg backward by pressing through the full foot. Extend the leg until you feel a complete glute contraction.
- Slowly lower back to the starting position and repeat for repetitions.
45-Degree Cable Kickback
https://www.youtube.com/watch?v=6_FiVpo8OzcVideo can’t be loaded because JavaScript is disabled: Cable 45 Degree Kickback (https://www.youtube.com/watch?v=6_FiVpo8Ozc)
[Read More: The 15 Best Cable Exercises for Hypertrophy, Strength, and Stability]
Why Do It: These cable glute kickbacks keep your leg at 45 degrees. Keeping your leg this way will bring your hamstrings and calves more into the movement, and it also targets your gluteus medius a little more than the usual variation.
Equipment Needed: This move just needs a cable machine and ankle strap.
- Set up your cable machine the same way you would a standard glute kickback.
- Brace against the machine and stabilize your body. Drive your working leg backward at an approximate 45-degree angle.
- Fully contract the working glute to complete each repetition. Slowly lower back to the starting position and repeat for repetitions.
Glute Kickback Alternatives
If your cable machine is out of commission or you’re simply looking for some alternatives to play with, we’ve got some great alternatives for you. The best exercises here will give your glutes fantastic stimulation while allowing different angles than your major lower body exercises.
Resistance Band Abduction
https://www.youtube.com/watch?v=NeO0w4Jv4rsVideo can’t be loaded because JavaScript is disabled: Banded Seated Hip Abduction (https://www.youtube.com/watch?v=NeO0w4Jv4rs)
[Read More: Best Resistance Bands for Glutes of 2024]
Why Do It: Many athletes do moves like this one to warm up for squats, and with good reason. Train yourself to resist unintended, overexaggerated collapsing of your knees inward during loaded squats and other knee-and-hip focused moves.
Equipment Needed: You’ll need a plyo box or a weight bench, along with a mini resistance band.
- Take a seat on the edge of a bench or a box. Wrap a resistance band around your knees.
- Slightly hinge forward and brace in this position. Engage your core and pre-tighten your legs.
- Drive your knees out against the band resistance. Keep squeezing until your glutes feel fully contracted. Return to the starting position under control and repeat for repetitions.
Machine Hip Abduction
https://www.youtube.com/watch?v=G_8LItOiZ0QVideo can’t be loaded because JavaScript is disabled: How To Use The Seated Hip Abductor (Outer Thigh) (https://www.youtube.com/watch?v=G_8LItOiZ0Q)
[Read More: Are You Leaving Glute Gains On the Table? Try This Two-Move Finisher]
Why Do It: Since you’ll be seated and braced against the machine, you can afford to up the weight once you’re sufficiently warmed up. You can load heavily without strain on your lower back or overall body.
Equipment Needed: You’ll have to find a hip abduction machine for this one. Otherwise, opt for the banded version, described above.
- Sit down in the machine with your outer legs snug against the pads and your back flat against the backrest.
- Start with the machine in the position that allows your legs to begin as close together as possible.
- Brace your full body and maintain this starting posture. Drive your legs out against the pads until your glutes have fully contracted. Repeat for repetitions.
Step-Up 
Why Do It: You can customize this move to your mobility and fitness level by using a different size step (or plyo box). That way, beginners can take this move to the next level while advanced athletes can also use it to improve mobility and unilateral strength while jacking up the heart rate.
Equipment Needed: Use a step-up platform or plyo box for this one. Dumbbells in your hands are optional.
- Select a box that allows you to get approximately 90 degrees or more of knee flexion.
- Place one foot on the box, brace your core, and tighten your legs.
- Place as much weight as possible on the working leg and step onto the box.
- Lower yourself under control back to the starting position. Avoid letting gravity do the work as much as possible. Repeat for even repetitions per leg.
Who Should Do the Glute Kickback
The glute kickback is often overlooked as a prominent glute exercise, though it shouldn’t be. It has clear benefits for physique enthusiasts but also is extremely helpful for gym newbies and older lifters alike.
- Physique Enthusiasts: If you want to compete in bodybuilding or simply have some jeans you want to fill out, glutes are a must. Outside of big barbell or machine exercises (such as squats or leg presses), the glute kickback has been a fixture for physique enthusiasts for ages. The precision targeting and ability to train with greater frequency cannot be beaten.
- Beginners: There are a lot of transferable benefits that a newcomer to the gym gains from the glute kickback. The central focus is always gaining muscle mass, but the set-up and execution of a good cable-based glute kickback teach a ton about proprioception and discipline. This reinforces proper technique and allows you to chase high-intensity sets through the burn instead of heavy weights.
- Older Lifters: A strong set of hips is a huge asset as you age, and the glute kickback is a lifter-friendly way to keep targeting your glutes. Many of the staple lower body exercises that hit your glutes are also very physically demanding in other ways. The glute kickback provides a low barrier to entry method of stimulating the hips, building proprioception, and confidence for an older or less experienced lifter.
Glute Kickback Sets and Reps
The glute kickback isn’t one that you’re going to do for max load. Since you are using a long lever with your leg, heavier loading would break down your form too quickly. Instead, try using sets and reps for muscle, endurance, or even warming up.,
- For Muscle Mass: Perform 2-4 sets of 10-15 repetitions. Aim for 1-2 repetitions in the tank at the end of each set and rest for 90 seconds to 2 minutes between sets.
- For Endurance: To build endurance, perform 3-4 sets of 15-20 repetitions per leg. Plan for only 30 seconds of rest between sets and aim to feel a vicious burn.
- For Warming Up: To warm up for other lower body exercises, perform 1-2 sets of 15-20 repetitions per leg. Use a 1-2 second pause in the fully contracted position for the best results.
Benefits of the Glute Kickback
The glute kickback builds your glutes, especially when you combine it with a full lower-body workout. It stands out because it also allows for some precision targeting of specific sections of your glutes and deals with significantly less load than the barbell exercises in your program.
Bigger Glutes
Most of the tools in your glute workout box are going to be compound exercises. This means that they may also target your quads and hamstrings, and certainly engage your core. The glute kickback helps to work around these other muscles, making it easier to isolate your glutes as the main target.
Precision Targeting
With more specific isolation comes a better chance at growth. Here, you’ll be more successful in making the glutes your primary muscle without other areas getting in the way and building fatigue.
The glute kickback doesn’t just make it easier to isolate your whole glute — you’re also able to angle the exercise to help load certain regions of your butt. The gluteus maximus, medius, and minimus make up the three major glute muscles and all contribute to your glute kickback.
Choosing specific angles to perform your kickback helps to align with the muscle fibers of your gluteus medius. Your gluteus maximus is the workhorse of force production, but choosing a 45-degree angle for execution helps stress your gluteus medius a bit more too.
Lighter Load
One of the biggest benefits of cable-based exercises is the lighter loads needed to gain stimulus compared to free weights. The glute kickback is no exception. Compared to a squat or a deadlift, the glute kickback needs next to no weight to make it a challenge.
Since you keep your leg long and use precise control to perform your glute kickback, even lighter loads feel heavy. You’ll still get great growth but it also allows you to use way less weight to accomplish the goal.
Muscles Worked by the Glute Kickback
The glutes are the major muscle group worked by the glute kickback. The glutes are broken down into their three distinct muscles; being, the gluteus maximus, the gluteus medius, and the gluteus minimus.
|
Gluteus Maximus |
Gluteus Medius |
Gluteus Minimus |
|
|
|
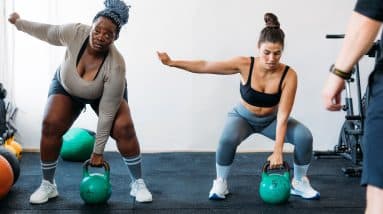
[Read More: Try These Kettlebell Glute Workouts to Kick Your Butt Into High Gear]
Common Glute Kickback Mistakes
Although the glute kickback is a relatively straightforward exercise, there are still some common mistakes that flare up from time to time. Not bracing properly, adding too much momentum, and improper load selection are the biggest culprits.
Not Bracing Properly
The point of the glute kickback is to target and stimulate the glutes as specifically as possible. This means squeezing your butt, and subsequently, your butt moving the weight. While that may sound silly, the reality is that a lot of lifters move other parts of their body to accomplish the glute kickback.
Anchoring yourself in place with a strong brace and counterforce against the machine (using your arms to lock yourself in a specific position) are key ways to isolate your glutes. Do not allow your lower back to arch, don’t flare your upper back, or sway your hips. Brace up, and only contract your glutes. Movement from your butt should move that pulley, nothing else.
Momentum
Momentum is an issue with nearly every exercise from time to time. And sometimes, a bit of body English toward the end of your set can help you push past failure and add some extra growth potential.
 Credit: Nikolas_jkd / Shutterstock
The issue arises when you accidentally use momentum that you didn’t mean to do, kicking in other areas of lower body strength to get you to the top of the movement without enough challenge to your glutes. Be disciplined, brace up, and only contract your glutes with proper form and a full range of motion.
Too Much Weight
The glute kickback takes advantage of a longer level system than say a leg press. This means that your leg staying relatively locked out keeps the resistance further from the muscle that is moving it. This makes the weight feel heavier and thus you need less of it to perform the glute kickback.
[Read More: Are Squats the Most Effective Exercise for the Glutes?]
This also means the glute kickback is susceptible to form breakdown if you load it too much. This same longer lever amplifies the challenge against your brace, meaning shooting for strength is likely to break you down even faster. Aim for loading schemes that allow you to mainly feel the glute, maintain position, and hit close to muscle failure around 10 to 15 repetitions.
Kicking Into High Gear
The glute kickback has been lurking around gyms since the introduction of cable machines. While some lifters hesitate to add them in, glute kickbacks pair just as well with squats and deadlifts as the dumbbell flye does with the bench press. For added glute gains with less load, a great proprioception builder, and a way to chisel in specific areas of your backside, look no further than the glute kickback.
FAQs
The glute kickback is a great way to add some spice to your lower body routine. Here are answers to any lingering questions.
Are kickbacks good for the glutes?
Glute kickbacks are fantastic for the glutes. Think of them as the dumbbell flye to your bench press or straight-arm pulldown to your dumbbell row. They give you another huge shot of stimulation for glute growth from a different angle and use less weight to accomplish the job. They serve as a fantastic synergist to your squat or hip hinge moves.
Are kickbacks better than squats?
The question of “better” depends on what you want. If you want a glute isolation exercise, then you want the kickback. Searching for a way to build stronger glutes without taxing your lower back or other parts of your lower body? The glute kickback wins that, too.
But if you want an overall strength and mass builder that heavily involves the glutes, the squat takes the cake.
For a well-balanced program, aim to integrate both of them into your workouts. The better philosophy is to integrate them both into your workouts. Generally, you’ll start your day with squats and use the kickback as an accessory move.
What muscles are targeted during the glute kickback?
The glute kickback primarily works your gluteus maximus, medius, and minimus. While this move is by no means a core exercise, you’ll also need to brace through your core.
The post How to Do Glute Kickbacks to Build Your Butt appeared first on BarBend.

Iliza Shlesinger’s Empowering Prenatal Pilates Routine: A Fitness Journey for the Health and Fitness Enthusiast
A Pilates session with comedian Iliza Shlesinger isn’t a quiet event. Class might involve her dog, Tian Fu, jumping on the reformer, or her 2-year-old, Sierra, pulling at the ropes. It will definitely feature Shlesinger’s snide commentary (“I call this move ‘the Sasquatch’”). And these days, it might also include a few pregnancy-induced burps.
Shlesinger first started doing Pilates shortly after Sierra was born, and she quickly got hooked. She invested in her own reformer to regularly train at home with Pilates trainer Alisha Mullally, and began doing mat workouts on her own whenever she was on the road for work. Today, snippets of Shlesinger’s Pilates sessions make almost as many appearances on her Instagram account as snippets of her stand-up.
When she became pregnant again in 2023, Shlesinger says there was no question that she would continue practicing prenatal Pilates, but with a few modifications, in order to stay safe. “I believe a big part of a healthy pregnancy is carrying on with all the things you did before you were pregnant,” she says. She also knows that safely exercising during pregnancy offers a whole bunch of benefits: The American College of Obstetricians and Gynecologists says doing so can help reduce back pain and constipation, and may decrease your risk of gestational diabetes and preeclampsia. One 2018 study even found that those who regularly work out while pregnant spent almost an hour less in labor.
A couple months before her due date, Well+Good filmed an episode of our online video series “Good Moves” with Shlesinger and Mullally at Avenir Pilates in Burbank, California. In it, they demonstrate a feel-good prenatal Pilates routine on the reformer that’s safe for any trimester.
Want to see the whole Good Moves routine? Check out the video below, or follow this link.
Following the “Good Moves” video, we chatted with Shlesinger to learn more about her approach to Pilates, why it’s become an essential part of her prenatal routine, and what she has to say to her skeptics on Instagram.
Question: What made you start doing Pilates after having your first baby?
Iliza Shlesinger: My manager told me that she’d been doing Pilates with this incredible trainer who came to her house. And, you know, once you have a baby, it’s weird: All you want to do is leave the house, but the last thing you want to do is leave the house. So I was introduced to my trainer, Alisha, and we started doing mat Pilates.
Q: What did you like about Pilates?
IS: It was very difficult but also gentle at the same time. And I got to lay down, which was such a plus.
Q: What have been the main modifications you’ve made while pregnant?
IS: There’s no more laying down on my back, and there are no abs to engage. But my trainer’s like, “Doesn’t mean we can’t work your arms!” And you can always work your inner thighs, which feels a little weird because of all the relaxin. Really, my favorite part is beating myself up about how bad my workout is and then having my trainer tell me like, “No, you did great. You’re very pregnant.” And then I’m reminded like, yeah, I’m growing a human. It’s okay that we didn’t do legs and loops today.
I just toured through Europe [and while I was there, tried to practice Pilates]. There was this one guy in France who just looked at me, and in a very French way was like, No, I don’t train pregnant women. I respected that [but] I’ve been doing Pilates long enough that I know how to make my modifications, [so] I signed like a little waiver. And then the bulk of the exercises we did, I just couldn’t do it, but I had too much pride to leave. So I just sat there doing very tiny ankle flexion workouts.
Q: Do you have any favorite prenatal Pilates moves these days?
IS: Anything I can do where I can feel my upper thighs screaming makes me feel like I have some control over what’s going on. And “hug a tree” is always nice because you get to see yourself in the mirror, and I don’t look pregnant in my arms, so that’s always a nice little walk down memory lane.
Anything I can do where I can feel my upper thighs screaming makes me feel like I have some control over what’s going on. —Iliza Shlesinger, on her favorite prenatal Pilates move
I also do a lot of balancing moves. You can see them on my Instagram, and I always get annoyed when people comment that I shouldn’t do it: I’ve been doing Pilates for over a year with a trainer. Plus, she’s [with me when I’m practicing].
Q: Everyone’s an expert on Instagram.
IS: Everyone’s an expert on women on Instagram, for sure. What would we do without the comments section?
Here’s a rule: Don’t tell pregnant women what they can and can’t do. There are women flipping cars and tires in CrossFit who are pregnant just like me. I’m fine.
Q: Do you feel different at all after a Pilates session?
IS: I always love feeling sore the next day. As an “athlete”—please put that in quotes—you always feel like it’s a job well done. You got to a muscle that maybe you had neglected or needed a little extra attention. You never feel bad having done a workout, no matter how short it is. Even if you only get a little bit of sweat, a little bit of your heart rate up, it’s still something.
Q: And how does it affect you mentally?
IS: Any time you can carve out time for yourself, not looking at your phone, it’s always good to come back into the world with fresh eyes, feeling a little exhilarated, having exhausted yourself. The actual only way to get me to not be on my phone is to pay someone to train me. I’m always cognizant of the fact that I paid for the hour, so I try to get every last drop out of it. But we have a lot of fun. We let the dog come in. Sometimes my daughter comes in, and that’s bonus weight on the carriage.
Q: I was going to ask, is that intentional to have your daughter watch you stay active throughout your pregnancy?
IS: Ever since she was little, she would sit in her little baby bouncer and she’d watch. It’s cute—she says the word “Pilates” and she knows that there’s ropes involved and she just wants to be with us. Any behavior you model for your child, they internalize. My mother worked out. She also had a job and she was a single mom for a while who took care of all the gardening and all the maintenance and never talked about it. She just did it. And I think there’s an incredible benefit to women seeing other women naturally just do very strong things because it instills it in you without being demonstrative about it.
Q: Any last thoughts on Pilates you want to share?
IS: I own an Allegra 2 reformer, and I love it. But I also think mat Pilates offers so many benefits. You can do it anywhere. You don’t even need a sports bra. You don’t even need pants on. You can do it in a hotel room on a towel. And trust me, I have.
Stop Comparing Your Body to Others at the Gym: Here’s How to Preserve Your Joy and Confidence
You’ve been wanting to try the cardio dance class everyone’s been talking about. You sign up and pick out your cutest gym outfit—ready to slay your workout. But you walk in and you immediately regret it.
The room is full of women seemingly fitter than you. Never have you felt more aware of the size of your body. This was supposed to be a fun and health-giving experience, but it’s become a serious self-loathing session.
If you’ve ever experienced body comparison at the gym, you know it can dissolve your happiness in a blink. But the gym is a place for folks of ALL sizes. So how do you take advantage of the fitness classes and equipment there—without feeling discouraged about your body image?
Studies show that comparing your physique to others lowers your positive body image and increases your odds of developing an eating disorder. Below nutrition and fitness experts, who assist people in their body-acceptance journeys, are offering advice on how to not size yourself up to others when you work out.
5 tips to stop engaging in body comparison at the gym 1. Prepare your mind in advance
When it comes to addressing body image issues around exercise, the work starts before you enter the gym doors, says Rebecca Toutant, RD, CEDS, CDCES, CPT of Nourishing Bits and Bites. Consider your self-talk while working out. Is it negative or positive? Do you already struggle with body acceptance?
Often repetitive negative thoughts about our body aren’t true. Toutant reminds us, “What we ‘see’ in the mirror and in looking at others is not objective truth or fact. Rather, how our brain processes the information is influenced by our emotional state.”
How can you get amped up with positive thoughts before a workout? Start with gratitude for your own body. Affirmations and personal mantras can be repeated to flip negative thinking to positive. Eating disorder specialist Laurie Dunham, RD, CED-S, LD, suggests the following examples:
- “I am thankful for my strong legs that carry me through the day.”
- “I am thankful that my arms allow me to hug the people I love.”
- “I am grateful for a functioning GI system that allows me to properly digest food so I have the energy needed to work and play.”
- “I am enough.”
- “I am strong.”
- “I am more than a body.”
What else can boost your confidence before you walk into the gym? The right playlist! Toutant suggests, “Choose empowering audio. Put on some tunes that leave you feeling strong and confident.”
If that doesn’t feel like enough to help you work through any blocks or limiting beliefs you have about your body, consider seeking out help from a therapist to get to the root causes and address them.
2. Appreciate body differences
The gym presents a display of various body types. The key is to not compare and despair when you see people who look different than you. “There will always be aspects of others we are envious of, but if we can turn that energy into trying to appreciate differences, it can be incredibly beneficial,” Dunham says. “It would be so boring if we all looked the same!”
Studies show that body appreciation is related to better eating habits, fewer body image disturbances, and overall improved mental health. Add to that list enhanced sexual satisfaction and self-compassion and I’d say it’s time to extend a thank you to your body.
Furthermore, your body size does not determine your physical fitness or overall health. “Someone can ‘look’ what society may describe as ‘healthy’ or ‘fit’, but they may be struggling with health or performance,” Toutant points out. Conversely, health is possible at every size—despite what weight stigma would have us believe.
3. Focus on your own fitness
Ever hop on the treadmill next to someone and enter an unspoken competition? Or add on more weight than what’s comfortable to the barbell because someone else can lift that much? Using someone else’s performance as a measuring stick for your abilities is a surefire way to increase your chances of injury and overtraining.
“Your needs and progress are your own,” Toutant says. “Whether or not someone can do more or go faster doesn’t ‘undo’ how far you’ve come. You ARE worthy of belonging right here, right now, as you are. There’s nothing to prove.”
When you feel your gaze wondering to those around you to see how you stack up to what someone else is doing, take it as a sign to recenter yourself and remember why you’re working out in the first place. “Focus on intrinsic goals,” Dunham says. “Think about where you are now and where you want to be concerning strength, flexibility, endurance, and how you feel, both mentally and physically, every day.”
4. Be friendly
Your insecurity may make you feel closed off from others, but gym friends can make all the difference! Resist the urge to withdraw. “Smile. Laugh. Consider eye contact. So many people walk around plugged in, blank stare, and in their own world—often to preserve themselves,” Toutant says. “You don’t need to make best friends, but it’s okay to acknowledge one another.”
While you may think everyone is noticing your imperfections, other gym-goers are not concerned about your body. Instead, everyone is in the same boat. They may even be feeling apprehensive about a new class or gym like you are, which is totally normal.
“Many people feel insecure at the gym,” Toutant says. “There is so much vulnerability in trying something new, re-starting a journey after a pause, moving your body in new ways, your body not feeling the way it used to, seeing unfamiliar faces, and quite literally feeling physically and emotionally uncomfortable. Just know at the end of the day, we’re all human.”
5. Find a place where you feel welcome
Not all gyms are created equal. Every facility will have its own feel. “Find the ‘gym culture’ that aligns with your values,” Toutant suggests. “If you choose to go to a gym rooted in hierarchies and competition, it may not be the best move for feeling better in your body.”
What’s the messaging promoted by the gym? Is it all about body modification or body inclusivity? Look at customer relations. Do the trainers treat everyone the same? Are you greeted kindly?
If you’re not feeling the vibe, find an alternative option for exercising. “Movement can happen anywhere,” Toutant says. “If being in the gym is too much of a distraction or leaves you feeling rough about what you’ve done or are doing, take a break and focus on your own path.”
10 Leg Stretches That Will Supercharge Your Lower Body Fitness
If you do it right, leg day is an intense experience. Squatting, lunging, and hinging until you’re a puddle on the gym floor takes up a lot of time and mental real estate. But once you’ve crushed your leg exercises, you’ve got to reassemble yourself — leg stretches can do that very well.
 Credit: djile / Shutterstock
Leg day is not just about strength. It’s also one way to stay on top of your mobility, using loaded stretching as a tool to double down on your flexibility. Leg stretches are a massive asset in preparing for a bodyweight leg workout or helping you cool down after the fact. If you’re looking to flex some lower limb knowledge, here are the 10 best leg stretches.
Best Leg Stretches
- Seated Pigeon Pose
- Pigeon Pose
- Half-Kneeling Hip Flexor Stretch
- Couch Stretch
- Adductor Split Stance Stretch
- Frog Pose
- Hurdler’s Stretch
- Standing Toe Touch
- World’s Greatest Stretch
- Calf Stretch
Editor’s Note: The content on BarBend is meant to be informative in nature, but it should not be taken as medical advice. When starting a new training regimen and/or diet, it is always a good idea to consult with a trusted medical professional. We are not a medical resource. The opinions and articles on this site are not intended for use as diagnosis, prevention, and/or treatment of health problems. They are not substitutes for consulting a qualified medical professional.
1. Seated Pigeon Pose
https://www.youtube.com/watch?v=9duW9HncInYVideo can’t be loaded because JavaScript is disabled: Seated Pigeon Pose (https://www.youtube.com/watch?v=9duW9HncInY)
[Read More: Yoga for Bodybuilding: How Getting Flexible Helps You Gain Muscle]
Primarily targeting the glutes, the pigeon pose delivers a very efficient stretch with scalable options for all mobility levels. But the classic, original variation can be tricky to learn.
Enter the seated pigeon pose. This variation allows you to choose the position that best serves your current needs. Use this option to ease into leg stretches and practice pristinely controlled stretching.
How to Do it:
- Sit on the edge of a weight bench with your feet flat on the floor. Aim for your legs to make an approximate 90-degree angle at the knee.
- Place your left ankle on top of your right knee, creating a figure-four position with your legs.
- Keep a tall posture and lightly hinge forward until you feel a stretch across your glutes.
Coach’s Tip: Be sure to maintain square hip and knee positioning. Try not to let your support knee drift off to one side as this diminishes the stretch.
Sets and Reps: Perform 2-4 sets of a 30-second timed hold on each side. No rest is required between sets.
2. Pigeon Pose
https://www.youtube.com/watch?v=1o7awuDGzagVideo can’t be loaded because JavaScript is disabled: PIGEON STRETCH (https://www.youtube.com/watch?v=1o7awuDGzag)
[Read More: How Strength Athletes Can Add Yoga to Their Program]
The classic pigeon pose is the next step in stretching your glutes. Where the seated pigeon pose uses a bench as a support, the classic pigeon pose places you on the floor. This small change increases the mobility demands but also allows for a potentially deeper stretch.
How to Do it:
- Place one leg on the floor with your shin and foot resting underneath your body.
- The opposite leg should be flat on the floor behind the rest of your body.
- Keep your back straight and slightly lean forward, similar to performing a hinge.
- Choose a shin angle on your forward leg that allows you to feel a deep stretch in your glute but isn’t forced into position. Hold for time.
Coach’s Tip: You don’t need to aim for a completely straight left-to-right shin angle for benefits here. Find the shin angle that allows you to feel a mild stretch without discomfort.
Sets and Reps: Hold the pigeon pose for 2-4 sets of 30 seconds. Perform a 30-second stretch on both sides to complete one set.
3. Half-Kneeling Hip Flexor Stretch
https://www.youtube.com/watch?v=0J360jIbhYUVideo can’t be loaded because JavaScript is disabled: Hip Flexor Stretch- Kneeling (https://www.youtube.com/watch?v=0J360jIbhYU)
[Read More: New Study Finds That Stretching Can Directly Create Muscle Growth]
Between training the lower body and the amount of sitting involved in the average lifestyle outside of the gym, your hip flexors are almost certainly tight at some stage of the week.
The hip flexors are a group of muscles that sit at the top of your thigh around your hip crease. While it doesn’t take a hard sell to get most people stretching them (it feels really good), nailing the technique is paramount for the best results.
How to Do it:
- Kneel down on your right knee, making a 90-degree angle on your left leg.
- Keep your hips square and pointed straight ahead.
- Brace your core and prevent any flaring of your ribcage.
- Squeeze your glute on your right leg, pushing your hips forward naturally. Hold this posture by maintaining the glute squeeze.
Coach’s Tip: Keep your torso stacked over your hips on this stretch. Squeezing the glute extends your hip and gives you all the stretch you need in the perfect spot.
Sets and Reps: Perform 2-4 sets of 30 seconds per leg, alternating sides without resting until all sets are complete.
4. Couch Stretch
https://www.youtube.com/watch?v=QiKl5UoiG5cVideo can’t be loaded because JavaScript is disabled: Couch Stretch for Hip Flexors (https://www.youtube.com/watch?v=QiKl5UoiG5c)
[Read More: How to Do the 90/90 Stretch to Squat Heavier and Move Better]
The couch stretch is an advanced version of the half-kneeling hip flexor stretch. Whether you’re using a bench, yoga block, or couch itself, this is a move you should ease into. A deeper stretch or higher pain tolerance isn’t necessarily the name of the game for stretching your legs. Dial in the right spot and you’ll get everything you need from the couch stretch.
How to Do it:
- Kneel down on your right leg with a couch (or bench) placed close behind you.
- Make a 90-degree angle with your left leg ahead of you.
- Place your right ankle or the top of your right foot on the edge of the coach (or bench).
- Flex your right glute and keep your back straight as you feel a stretch develop across the length of your right quadriceps.
Coach’s Tip: Be sure to maintain a stacked torso posture here as well. Do not arch your back or you may begin losing the stretch in the place you’re trying to target.
Sets and Reps: Perform 2-4 sets of 30 seconds per leg here, starting slow and easing into it. There is no need for rest between legs. You can simply alternate once each hold is complete.
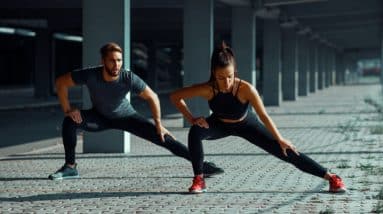
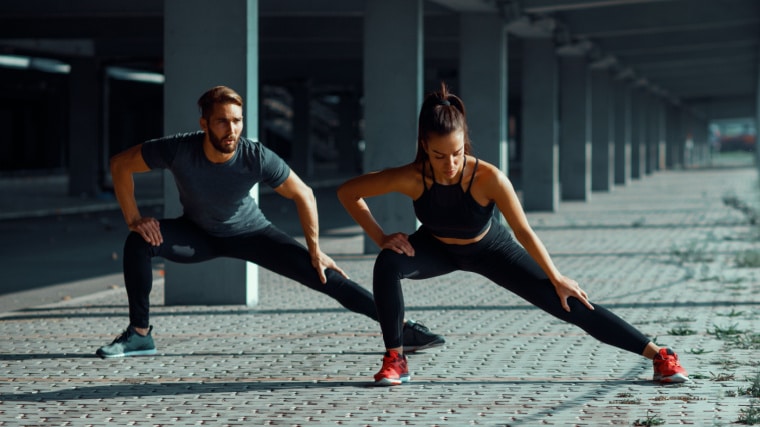
5. Adductor Split Stance Stretch
https://www.youtube.com/watch?v=ANue9qDFg90Video can’t be loaded because JavaScript is disabled: Hip, groin and inner thigh – Adductor stretch in standing (https://www.youtube.com/watch?v=ANue9qDFg90)
[Read More: 7 Stretches That Can Help Your Posture]
The adductors are the inner thighs and are often forgotten about when the time comes to stretch the legs. Your quads, glutes, and hamstrings (and even calves!) are usually pretty obvious targets, but your adductors are very important as well.
Something as simple as an adductor split stance stretch is enough to make a difference in your lower leg mobility. Making sure the adductors are properly stretched before or after your workouts may help improve the range of motion on many movement patterns.
How to Do it:
- Take a standing position with your legs set outside of shoulder width.
- Keep your feet pointed straight ahead or subtly pointed out.
- Brace your core and shift your weight more towards your left leg.
- Keep your right leg straight and bend the left knee. Slowly push your right leg towards the floor.
Coach’s Tip: Ease into the adductor split stance stretch. The adductors are often targeted less and hold a lot of tension, so you won’t need much to start feeling them.
Sets and Reps: Perform 2-4 sets of 30-second timed holds per side, switch sides without resting to complete all sets.
6. Frog Pose
https://www.youtube.com/watch?v=0rwSFWC9x3EVideo can’t be loaded because JavaScript is disabled: FROG POSE: BEST STRETCH FOR LOW BACK PAIN AND HIP PAIN RELIEF! (https://www.youtube.com/watch?v=0rwSFWC9x3E)
[Read More: How Deep Stretching Promotes Emotional Release]
You’ll be working on dynamic stretching here. This stretch, borrowed from yoga, is a floor variation of the split stance adductor stretch and thus also stretches your inner thighs.
The frog pose is scalable and more dynamic than the split stance adductor stretch, allowing you to rock back and forth to find the perfect position. The frog pose is also extremely time-efficient as you won’t need to switch sides. One well-executed frog pose stretches both adductors at the same time.
How to Do it:
- Kneel down on your exercise mat and assume a quadruped position (on your hands and knees).
- Widen your leg stance enough that you create a triangle with your legs and the floor. You should place your weight onto the inner portion of your knees.
- Widen the leg stance as much as needed to begin feeling an adductor stretch.
- Using your arms, move yourself forward and backward to find the appropriate stretch across your adductors.
Coach’s Tip: Ease into your frog pose. The adductors are often tight and the frog pose is a very effective position to stretch them. It won’t take much to get started.
Sets and Reps: Hold your frog pose for 2 sets of 30 seconds to 1 minute at a time. You won’t need to switch sides as one frog pose stretches both adductors simultaneously.
7. Hurdler’s Stretch
https://www.youtube.com/watch?v=6LYSIXjuXi8Video can’t be loaded because JavaScript is disabled: Hurdler Stretch (https://www.youtube.com/watch?v=6LYSIXjuXi8)
[Read More: The 9 Best Stretches for CrossFit Athletes to Maximize Performance]
You might remember this one from middle school. The hurdler’s stretch is a simple way to begin stretching out your hamstrings and adductors but allows you to individually target each side. Using your own body as a landmarking tool for progress, reach for your toes and see how quickly your mobility improves each session.
How to Do it:
- Take a seat on the floor, extend your right leg slightly off to one side, and bring your left foot into your right inner thigh.
- Flex your right ankle to the sky to start your stretch, keeping your left foot in contact with your right thigh.
- Keep your back straight as you subtly begin to lean towards your right foot.
- Reach for your right foot and ease into a slight hamstring and adductor stretch.
Coach’s Tip: Once you have mastered the standard hurdler’s hamstring stretch, try rounding your back to move through other commonly stiff areas (for example, the lower back).
Sets and Reps: Perform 2-4 sets of 30 seconds per side. Alternate stretches between legs without resting.
8. Standing Toe Touch
https://www.youtube.com/watch?v=gmLS4RllgoQVideo can’t be loaded because JavaScript is disabled: Standing Toe Touch (https://www.youtube.com/watch?v=gmLS4RllgoQ)
[Read More: Active Stretches Explained — Science-Backed Selections for Optimal Recovery & Performance]
While simply bending over is usually enough to start feeling the stretch, adding a bit of finesse to your technique is a quick way to alter what you’re targeting. Shifting from side to side, or even keeping your back straight or rounded are ways to change the focal point of the standing toe-touch.
How to Do it:
- Take a close foot stance (about hip-width or closer) with your toes pointed straight ahead.
- Bend over and reach for your toes, allowing your back to round and relax into a deep stretch.
- You can also bring one foot into your hand and kick your foot back into your hand — this will provide a good quad stretch.
Coach’s Tip: Initiate with more of a hinge technique for a better hamstrings and glute stretch, or shift to one side for a better stretch into your quadratus lumborum.
Sets and Reps: Perform 2 sets of 30 seconds to 1-minute of the standing toe-touch. If you are emphasizing one side or using a different technique, perform the stretch once on both sides to complete one set.
9. World’s Greatest Stretch
https://www.youtube.com/watch?v=RibEzqNmm4sVideo can’t be loaded because JavaScript is disabled: World’s Greatest Stretch (https://www.youtube.com/watch?v=RibEzqNmm4s)
[Read More: 7 At-Work Stretches to Boost Your Gym Performance]
The world’s greatest stretch is named as such because it hits your adductors, hip flexors, glutes, and thoracic spine all at the same time. While it is taxing in its own right with all the moving parts, it would be hard to find a more well-balanced stretch for your routine.
How to Do it:
- Get into a deep lunge, sending your right leg ahead of your body and sinking into your right hip.
- In this extended lunge position, keep your hips square while you rotate your thoracic spine to face the floor before turning your torso to face the right.
- Switch legs and perform for repetitions, holding each part of the stretch for a few seconds at a time to stretch each muscle.
- Perform even repetitions on your left side and your right.
Coach’s Tip: Start small and work up. The world’s greatest stretch may feel like a workout itself, perform a handful of repetitions per side and rest as needed.
Sets and Reps: Perform 2-5 repetitions of the world’s greatest stretch per side. Hold each stretch sensation for 5-10 seconds before alternating sides. Rest between sides as necessary.
10. Calf Stretch
https://www.youtube.com/watch?v=SAuayeWseq8Video can’t be loaded because JavaScript is disabled: Calf Stretch with wedge (https://www.youtube.com/watch?v=SAuayeWseq8)
[Read More: Try These 8 Tight Calves Stretches to Improve Ankle Mobility]
Don’t neglect your calf muscles. But where many leg stretches take some effort to get into and hold, the calf stretch is a nice way to truly relax as you cool down. Performed either against a wall or with a small wedge, this one takes minimal effort for its benefits.
How to Do it:
- Take a front-to-back split stance with your lead foot placed upon a wedge.
- Flex your front ankle up to start the standing calf stretch. Keep your back leg flat or on the ball of your foot to support.
- Keep your knee on the lead leg slightly bent to prevent hyperextension.
- Lean forward into the lead leg, keeping the ankle flexed up and stretching your calf.
Coach’s Tip: Keep your back straight and perform a hinge technique to get the best stretch in your calf without spilling over into other muscles.
Sets and Reps: Perform 2-4 sets of 30 seconds per leg. There is no need to rest between sets, simply perform all rounds back to back.
Warming Up for Leg Stretches
As much as possible, avoid stretching your muscles cold. You don’t want to sink too deeply into a stretch suddenly before your muscles are acclimatized. Think of it like performing ramp-up sets of back squats — you do some reps with an empty barbell and then gradually get heavier instead of diving right into your working sets.
Something as simple as five to 10 minutes of moderate cardio can improve your stretch session with minimal upfront effort.
A few examples may include:
- Stair Climber: 5 minutes at moderate intensity.
- Exercise Bike: 10 minutes at moderate intensity.
- Elliptical: 10 minutes at moderate intensity.
- Rowing Machine: 5 minutes at moderate intensity.
How to Train for Leg Flexibility
Using both dynamic and static stretching can help enhance your lower body flexibility. Incorporating stretches before or after your leg day during a structured dynamic warm-up or cool-down is the obvious route, but the resistance training session flow itself works well too.
Try performing your lower body exercises (for example Romanian deadlifts or Bulgarian split squats) with tempo training techniques.
https://www.youtube.com/watch?v=B4Bm8QnbapAVideo can’t be loaded because JavaScript is disabled: Joe Yoon: Better Stretching and Mobility (Podcast) (https://www.youtube.com/watch?v=B4Bm8QnbapA)
Controlling the eccentric portion (the lowering half) of each repetition is a way to incorporate loaded stretches into your routine. In combination with your warm-up or cool-down routine, loaded stretches are a powerful way to build and maintain your flexibility.
Selecting Leg Stretches
Your program helps direct which stretches you’ll get the biggest benefit from. Warming up is a great way to identify where you feel tightness and best select the stretches for you. Once you have completed your general cardio warm-up, make sure to take on some lower-load ramp-up sets for your first exercise.
Visual feedback on your technique (from the mirror, film, or a trusted training buddy or certified personal trainer (CPT) can help you figure out what areas you need to work on. You can also simply monitor where you’re feeling tight to..
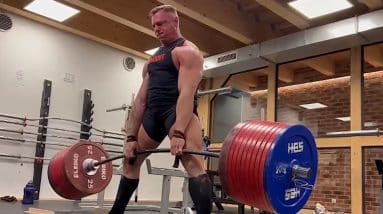
Krzysztof Wierzbicki Astonishes with Jaw-Dropping 510-Kilogram Beltless Deadlift Off Blocks
Polish powerlifter Krzysztof Wierzbicki is deadlifting unfathomably heavy again. The 110-kilogram lifter shared a video on his Instagram page on Jan. 17, 2024, wherein he pulled a monstrously heavy 510 kilograms (1,124.4 pounds) off blocks in a sumo stance while wearing lifting straps.
While Wierzbicki’s deadlift was not pulled off the floor — meaning that the range of motion from the bottom of the lift to lockout is narrowed — he did not wear a lifting belt. You read that right: Wierzbicki locked out a 510-kilogram deadlift off blocks without any equipment other than lifting straps. Check it out below:
View this post on InstagramA post shared by Krzysztof Wierzbicki (@mr.deadlift)
[Related: Brian Le (66KG) Raw Deadlifts 12.5 Kilograms Over the IPF World Record In Training]
Given that Wierzbicki has pulled the heaviest deadlift ever seen on camera — a 502.5-kilogram (1,107.8-pound) sumo pull in April 2022 — it should not come as a surprise that he is continuing to add weight to the barbell.
However, adding 7.5 kilograms (16.5 pounds) in the context of the heaviest-ever-seen deadlift is surprising. To contextualize, it can’t be contextualized. That range was unfathomable, as it was uncharted territory since no human had ever done it. Wierzbicki just almost (read: off blocks) did it.
For reference, below is the video of that 502-kilogram effort:
View this post on InstagramA post shared by Julian Howard (World’s Strongest Fan) (@worldsstrongestfan)
[Related: Amanda Lawrence (84KG) Squats a 250.5-Kilogram Raw Double]
Wierzbicki did not share his body weight at the time of this remarkable 510-kilogram block-pull. He does, however, appear more muscular than his previous deadlift PR, though camera angles can be deceiving. The 510-kilogram block pull was 4.64 times his 110-kilogram competition body weight.
The closest comparison to this pull is less likely to be found in competitive powerlifting and more likely to be found in the world of competitive strongman. The partial deadlifts performed in strongman are at similar weights; the current Hummer tire deadlift is 549 kilograms (1,210 pounds), locked out by 2020 World’s Strongest Man Oleksii Novikov of Ukraine at the 2022 Shaw Classic.
However, the similarities of Novikov’s record lift more or less end at the weight. Novikov pulled in an equipped conventional stance rather than a nearly raw (straps) sumo stance, and rather than weight plates on the barbell, there were giant treaded wheels intended for a gas-guzzling SUV.
Rauno Heinla holds the all-time 18-inch deadlift world record at 540 kilograms (1,190.5 pounds), scored at the 2023 Tartu Rammumees ja Rammunaine contest in Tartu, Estonia. Similar to Novikov’s lift, Heinla’s was performed in a conventional stance, though only with lifting straps and a weight belt, but with weight plates the size of Vauvillian bicycle wheels.
View this post on Instagram
A post shared by Rauno Heinla (@rauno_heinla)
Wierzbicki is more or less in a league of his own, forging a path into the realm of what is humanly possible with a barbell off the ground. Onlookers can assume Wierzbicki either has the capacity to add more weight to the barbell, eventually remove the blocks, or both.
Featured image: @mr.deadlift on Instagram
The post Krzysztof Wierzbicki Deadlifts 510 Kilograms Beltless Off Blocks In Training appeared first on BarBend.
Results of Team Event 5 at the 2024 Wodapalooza Miami
The penultimate event of the 2024 TYR Wodapalooza Miami competition featured a three-round waterfall-style exercise trio of biking, box step-overs, and kettlebell hang snatches.
Team Ice Barrel — Brooke Wells, Baylee Rayl, and Paige Powers — posted the top time among the female teams to build momentum with only one workout to go. Team TYR — Ricky Garard, Jayson Hopper, and Dallin Pepper — sealed the deal for the male teams.
[Stay Tuned: 2024 Wodapalooza Miami Live Results and Leaderboard]
View this post on InstagramA post shared by Baylee Rayl Christophel (@bayleerayl)
Elite Team 5 Results — Waterfall on the Bay
For time, each athlete completes three rounds (waterfall style) of:
- Echo Bike — Men: 24 calories | Women: 18 calories
- Eight Kettlebell Box Step-Overs — Men: 53 pounds | Women: 35 pounds
- 12 Double Kettlebell Hang Snatches
[Related: 2024 Wodapalooza Miami Team Event 4 Results]
Elite Female Team Results
- Team Ice Barrel — 10:24.94
- Stronger Than a 90s Trend — 10:54.69
- Rx Performance — 10:57.00
- Team Bareen — 11:06.65
- NGH — 11:17.34
- Team Scandinadian — 11:18.87
- Fearless Misfits — 11:19.83
- Team Treta — 11:38.75
- Mile High Muscles — 11:46.91
- Kolesnikov Team — 11:49.04
- Dixieland Delight — 11:49.21
- Team Frog Grips — 11:56.81
- Three Queens — 12:00.52
- Lycan Gang — 12:17.03
- Plus Ultra — 12:18.69
- Lifters Girls — 12:19.51
- Reebok Crew — 12:20.70
- US Army Warrior Fitness — 12:21.09
- Conquer Cuties — 12:34.50
- Base Wellness — 12:44.59
- Trailer Park Girls — 13:11.25
- Kriger Meets Trainingculture — 13:13.09
- Torian Black — 13:19.15
- Firebarns Club — 13:24.32
- Leapin Lemurs — 13:30.65
- Limey Girls — 13:34.79
- Sweet Sticky Thicc and Pretty — 13:50.02
Elite Male Team Results
- Team TYR — 9:20.00
- Team Picsil — 9:48.94
- The Strapping Young Lads — 9:55.89
- Team GOWOD — 10:02.89
- Ombré Hombres — 10:26.33
- Picsil Traincult — 10:41.52
- Team Gorila 911 — 10:44.47
- Complex Wodex — 10:47.60
- Conquer Athlete — 10:49.22
- Tres Leches — 10:51.50
- Project Girona — 10:54.21
- CrossFit Mayhem the Empire — 11:05.39
- Omnia — 11:13.77
- Truecoach Traincult — 11:19.87
- EFP — 11:25.53
- Canadians From the East — 11:29.16
- Foxed Ferret Manatee Men — 11:32.60
- Krypton — 11:38.90
- Velitus Traincult — 11:43.43
- Kinesis Black — 11:43.66
- Maxlift Australia — 11:51.44
- Team Overtake — 12:19.51
- Midwest Cowboys — 12:41.00
- Soul Ab Squad — 12:42.66
- DSM Performance TCC — 13:10.59
- Team Evolve — 13:11.63
- Tenskills Pro 1 — 13:21.84
- Rehab to Perform — 13:50.26
- Mayhem Outlaws DNF
- Rx Smart Gear WD
The last event for the Teams division at the 2024 TYR Wodapalooza is titled “Worm Fran,” and it is exactly what it sounds like — thrusters, pull-ups, and muscle-ups galore.
Featured image: @bayleerayl on Instagram
The post 2024 Wodapalooza Miami Team Event 5 Results appeared first on BarBend.

Results of Individual Event 3 at the 2024 Wodapalooza Miami Competition
The closing event of Day One at the 2024 TYR Wodapalooza Miami contest was titled “Deja Vu.” The adjusted workout at Bayfront Park in Miami, FL, due to inclement weather, challenged athletes to row, throw wall balls, pull their chins to the bars, jump over boxes, and snatch some dumbbells.
Below are the full results:
[Stay Tuned: 2024 Wodapalooza Miami Live Results and Leaderboard]
Event 3 Results — Deja Vu
Part A: Three minutes. Part B: Five minutes. Part C: For time (eight-minute time cap). One minute rest between each part.
- Assault Row — Men: 25 calories | Women: 20 calories
- 30 Wall Balls — Men: 20 pounds | Women: 14 pounds
- Strict Chin-Over-Bar Pull-Ups — Men: 20 reps | Women: 14 reps
- 30 Box Jump Overs — Men: 24-inch box | Women: 20-inch box
- 25 Single-Arm Dumbbell Snatches — Men: 100 pounds | Women: 70 pounds
This workout will apply two scores:
- Total reps across all parts
- Time on Part C
View this post on InstagramA post shared by The TYR Wodapalooza (@wodapalooza)
[Related: 2024 Wodapalooza Miami Individual Event 2 Results]
Results are recorded as follows: Athlete (number of reps + time)
Elite Individual Women’s Results
Emma Cary made a big push for the top spot during the last two events of the day. And with only a two-day, five-event weekend, a big push did the trick. The three-time CrossFit Games athlete took first place overall in this event, edging out Arielle Loewen. She came in second to Loewen’s first in Event 2, and successfully switched the order around in Event 3.
In doing so, she tied up second place on the leaderboard, just six points behind overall leader Gabriela Migala.
- Emma Cary (182 + 05:31.0)
- Arielle Loewen (180 + 06:36.4)
- Rebecka Vitesson (170 + 06:15.4)
- Gabriela Migała (169 + 06:18.0)
- Danielle Brandon (166 + 05:56.2)
- Abigail Domit (166 + 06:02.2)
- Rebecca Fuselier (166 + 06:44.6)
- Elizabeth Wishart (165 + 06:53.8)
- Lexi Neely (165 + 06:54.8)
- Sydney Wells (160 + 06:18.2)
- Emily Rolfe (160 + 06:19.9)
- Keara Napoli (157 + 06:52.4)
- Katie Canning (157 + 07:21.4)
- Nina Vragovic (157 + 07:24.4)
- Gabrielle Spenst (156 + 07:21.4)
- Caroline Stanley (155 + 06:36.3)
- Olivia Kerstetter (153 + 06:51.1)
- Jessica Androsik (151 + 07:01.9)
- Callista Lang (150 + 07:02.1)
- Margaux Masset (149 + 07:06.9)
- Grace Walton (147 + 06:20.6)
- Emily De Rooy (147 + 07:44.5)
- Ro Scott (147 + 07:58.7)
- Briony Challis (146 + 07:04.0)
- Andra Moistus (144 + 06:10.1)
- Becca Merritt (143 + 07:17.5)
- Feeroozeh Saghafi (142 + 06:04.7)
- Elena Carratala Sanahuja (142 + 07:07.6)
- Emily Rethwill (142 + 07:15.9)
- Freya Moosbrugger (141 + 06:28.1)
- Allison Weiss (141 + 06:54.5)
- Stacy Lerum (140 + 06:55.7)
- Bergros Bjornsdottir (140 + CAP + 109)
- Dani Speegle (135 + 06:37.5)
- Nicolette Torreggiani (135 + 06:46.0)
- Christee Hollard (135 + 07:07.3)
- Julia Hannaford (135 + 07:50.5)
- Ellia Miller (131 + CAP + 108)
- Ashley Shoemaker (124 + CAP + 117)
- Matilde Oyen Garnes WD
Elite Individual Men’s Results
The men’s side of the competition was full of climbing in Event 3, too. Ricky Garard, who had started the weekend with a lackluster 13th-place finish, also started his climb in Event 2 with a third-place run.
In Event 3, all bets were off as Garard worked his way to first place in the event and on the overall leaderboard. He’ll start off the second and final day of competition just 4.5 points ahead of Patrick Vellner for the top podium spot.
- Ricky Garard (199 + 06:02.1)
- CJ Gerald (198 + 06:44.6)
- Samuel Kwant (195 + 05:53.1)
- Brent Fikowski (193 + 07:48.0)
- Patrick Vellner (190 + 06:04.0)
- Jacob Heart (190 + 06:12.5)
- Roman Khrennikov (189 + 06:29.4)
- Samuel Cournoyer (186 + 06:12.6)
- Jack Farlow (184 + 05:59.0)
- James Sprague (184 + 06:08.9)
- Colten Mertens (184 + 06:43.1)
- John Wood (184 + 06:54.4)
- Nick Mathew (183 + 07:24.2)
- Austin Hatfield (181 + 06:11.6)
- Evan Rogers (181 + 06:54.1)
- Lucas Heuze (180 + 06:39.8)
- Travon Benton (179 + 06:38.8)
- Jack Rozema (179 + 07:06.0)
- Alex Vigneault (179 + 07:15.4)
- Connor Voltz (178 + 06:40.2)
- Harry Lightfoot (178 + 06:41.4)
- Henrik Haapalainen (178 + 07:08.0)
- Drake Lewis (177 + 04:42.3)
- Bronislaw Olenkowicz (176 + 06:50.5)
- Antonios Makaronas (175 + 07:42.1)
- Kalyan Ribeiro De Souza (174 + CAP + 122)
- Guilherme Malheiros (173 + 06:54.4)
- Luke Parker (173 + 07:07.3)
- Kaique Cerveny (172 + 07:08.7)
- Joshua Hong (170 + 07:40.6)
- Spencer Panchik (169 + 05:49.7)
- William Bennett (169 + 07:08.5)
- Francis Pelletier (168 + 07:24.0)
- Juan Ignacio Sforzini (163 + 07:15.9)
- Guilherme Domingues (160 07:51.1)
- Tanner Balazs (153 + CAP + 111)
- Arturo Torres (147 + CAP + 114)
- Nikita Yundov (141 + 07:55.3)
- Martin Feiferlik (129 + CAP + 115)
- Kevin Jurs DNF
- Alexandre Caron WD
[Related: 2024 Wodapalooza Miami Individual Event 1 Results]
The second day of competition for Individuals will feature the remaining two workouts. Once Individual champions are crowned, the Elite Teams will take the competition floor on Jan 13-14 for their competition in Miami.
Featured image: @
The post 2024 Wodapalooza Miami Individual Event 3 Results appeared first on BarBend.

Former NFL Quarterback Christian Ponder is Revolutionizing the Mindset of Retired Athletes in the ‘Post’-Sports Era
Former NFL star Christian Ponder discovered early in his career that a quarterback’s success oftentimes came down to preparation. Now as an entrepreneur, he’s parlaying those football experiences—both good and bad—and other athletic attributes to help former athletes in their transition from the field to the boardroom.
In September, Ponder launched The Post, a private membership club comprised of only professional college and former Olympic athletes. Ponder along with co-founder Jason LaRose, came up with the idea of this sports safe space with the intention of helping create a leadership network for ex-athletes to make the transition to the business world once their careers came to a close.
The adjustment from gameday to life after sports isn’t always seamless—it even affected Ponder, who had earned an MBA while playing at Florida State from 2007-2010, and was already prepared for a post-football life in finance.
“It didn’t take me long like mentally to be like alright, it’s over, it’s time to move on,” Christian Ponder says. “But there was a bit of paralysis by analysis when sports was over. You can choose any path to go down when it comes to do that next chapter, but it’s hard because it’s like, what am I good at? What am I actually interested in outside of sports and it does take a little bit of time to navigate that part of it.”
Ponder adapted, just as he did while during his collegiate days with the Seminoles. It wasn’t as if the Dallas, TX, native’s gameday preparation was ever incomplete. However, an abundance of interceptions—13 INTs as a sophomore at Florida State—as well as a whole host of admittedly bad decisions had placed Christian Ponder at a quarterback crossroads early in his career.
While calls for his benching grew louder, Christian Ponder quietly retreated to the film room, using whatever down time he had to elevate his ability to better read defensive coverages through countless hours of film study. At the same time, with the extra work, he, along with the help of then-offensive coordinator (and eventual head coach) Jimbo Fisher, was able to find and fix the multitude of “correctible errors” that had plagued his 2008 season.
The added prep was partly responsible for a complete offensive turnaround his junior and senior seasons. His interceptions had dropped significantly, his touchdowns increased, and his overall performance was not only helping silence the naysayers—he even got some early season Heisman whispers. His talents and leadership helped elevate his draft status when he was selected 11th pick in the 2011 NFL draft by the Minnesota Vikings. In his second season, Ponder led the Vikings to a playoff appearance.
“Coach Fisher always said the game was won and lost before you ever stepped on the field because of how you prepared, Ponder says. “So if you’re struggling you got to just reinvest much more effort and that much more time to prepare to be able to have that confidence to step on the field and play your best.”
Ponder says the ability to adapt through adversity is one of the attributes that makes athletes successful in the business world. It’s been reported that more than 90 percent of Fortune 500 CEOs played sports, and 52% of all female C-suite CEO played collegiately. With the Post, Ponder has created a club for this like-minded business types to use their skills and resources and sports skills—preparation, teamwork, and the intense commitment to competition—to help others find success in their post-athletic endeavors.
“It’s what we’ve kind of coined the athlete operating system, which is a set of intangibles—work ethic, grittiness, competitiveness and dealing with failure,” Christian Ponder says. “Dealing with it not in a depressing way, but how am I gonna learn from failure even and apply that to the next time. [Athletes are] coachable, ambitious and always trying to achieve more. And I just think those characteristics translate so well into business and sets you up for success.”
While Christian Ponder is continuing to help develop a Winning Strategy for helping other athletes achieve success, the same formula can be applied to his fitness as well. At age 35, Christian Ponder has maintained his NFL playing weight—225 pounds—relying on recycled Vikings training journals he kept for his post-football regiment.
Ponder admits to training with not quite the same intensity as he did during his playing days, when he was a member of the 400-pound bench club while starring at Florida State. These days his muscle maintenance is inspired by maintaining the good graces of his wife, ESPN host Samantha Ponder, by sticking to an agreement they made just after the couple tied the knot.
“After we got married she said, ‘Look when you’re done playing football, you can’t lose 10 pounds and you can’t go over 10 pounds from when we got married,” Christian Ponder recalls. “My playing weight was 225. So I can’t go past 235, and can’t get super skinny. So 225 was an ideal weight was to maintain. It gets harder as you get older…but I’m still right there.”
Winning Strategy: Christian Ponder 1. Most Mistakes Can Be Fixed, if You Work to Find and Correct Them
I had a lot of failures, a lot of bad picks, and just many bad plays. I think back to my redshirt sophomore year at Florida State. It was a bad season. A lot of people thought I shouldn’t be the starter for the next year. But what I did was I spent a lot of time in the film room. I spent a lot of time with my coaches, but also a lot of time by myself figuring out like, Why did you make all those stupid mistakes? What was happening? It made me a lot more confident to realize they were stupid mistakes—all preventable things, and up to me to invest in the time to get better, to study and understand defenses.
I think [former FSU coach] Jimbo Fisher had such a great perspective when it came to quarterbacks and success at the quarterback level. He would ask the question, “Why are we doing this?” “On this play, why is the pass route designed this way against this coverage and who are you identifying? Is it the corner? Inside linebacker? Outside linebacker? Safety? So spending a lot of time learning from that season really helped me have an incredible junior year. I think even after my junior year I could’ve turned pro in the NFL draft, but I had another failure—three interceptions against Clemson. The third [int] would’ve been been a pick 6, and I was so mad I tried to blow up a 230-pound safety—he barely moved and I ended up separating my AC joint and couldn’t go in the draft.
There have been a lot of failures. But what I learned from my sophomore year made me a better player.
 The Post2. Embrace Self Awareness
I appreciate feedback. There are times when it gets hard—it’s hardest when you’re not playing well and you’re not you’re confident. If it keeps piling on it can hurt your confidence. And confidence is really important, especially at the quarterback position and as you get into the higher levels where the pressure is the highest.
Losing your confidence is detrimental to your performance. But I think criticism is an important part of growth. And we have to be aware of the things that aren’t going well. One of the biggest strengths athletes have is this hyper-awareness and self criticism around things like, what went well, but also and more important, what didn’t go well with my performance and how to identify those things. Whether it’s through a coach criticizing me or any other forms of criticism, or just my own criticism against myself, I have to know the things that I can get better at and put in the effort to get better so I can perform better.
At the Post we believe in the strength of self awareness. So the resources that we offer our members include how to invest in self awareness. And then our job is to bring the resources to help our members get better at whatever they identify as things that they may be a little bit deficient in. We can help them get better and offer pathways of growth.
Obviously we don’t criticize people, we help people identify things that they can continue to get better at and how do we help them get there. That’s a part of the athlete journey. That’s a part of everyone’s journey, right? I think it’s your choice, whether you want to have some honest conversations with yourself and if you want to get better, you’ve got to figure out what you can get better at and how to do it.
 The Post3. A Strong Athletic Mindset Requires A Strong Physical Presence
What was so great about being in sports and football was that you had so much structure, especially when it came to working out. You always had a strength coach and a program. I knew that my time playing would eventually end, so I actually kept a lot of my workout books, especially during my time with the Minnesota Vikings, so I still try to follow similar things.
I belong to an Equinox in New York right down the street from me. And as much as I just hate working out in public gyms—where [many] guys aren’t used to like being in weight rooms and putting weights back or like, God forbid, you can’t go get a drink between your sets or someone’s gonna steal your bench. It drives me nuts, but I still try to get to the weightroom about five days a week. I don’t need to be as fit as I was on the football field and don’t need to be throwing around as much weight as I did while I was playing
I’ll also run in Central Park with a buddy of mine a few times a week, as well as do some anaerobic stuff like hill runs. I also play in a basketball league that’s both fun and competitive but also a great workout.
These days, however, I don’t have as much time. Back then it was your job to stay fit and you dedicated your time in the weightroom and conditioning throughout the day. It’s not the case now. I have three kids and I’m the founder of a startup. I don’t have the same amount of time, you know, to spend 90 minutes in the gym and work out.
I’ve learned that sometimes it’s OK to just get 30 minutes in and do what you can. That’s definitely different, and I’ve had to accept that. It got to the point a few years where it was like there was no point to a 30-minute workout. So I wouldn’t work out at all. So it became a change in routine and a change in mindset. I’m not trying to kill myself. At this point, it’s maintenance for me, not about throwing up big numbers. I just want to stay fit enough that I can keep chasing my kids around and live a long healthy life.
View this post on InstagramA post shared by Christian Ponder (@cpseven)
4. Why Christian Ponder Believes Athletes Need Outlets Like The Post
I got my undergrad in finance, and got my MBA while still playing at Florida State. I knew I wanted to get into finance. That’s one of the main reasons we moved to New York, it’s the financial capital world, I think on paper I had it all together. I didn’t expect the transition to be difficult, but it was. I think going through that experience was a big motivating factor for launching the Post.
We’re not trying to help athletes in transition. What we’re trying to do is build a community for athletes to transition into when they’re done. Like what I had when I transitioned to college or when I transitioned to the NFL, we kind of had this veteran locker room to step into and just like we had where you have players who were juniors and seniors in college or players in the NFL for 10-plus years, who knew what it took to compete at that level as a young person. Your building relationships. Learning via osmosis to figure how to compete at that level.
It’s the same what we’re trying to do: How do we take former athletes who are doing extremely well in business because of their athletic background. For me life [post-football] was a loss of identity, a sense of purpose, structure and routine and a loss of community. So for us at the Post, it’s about how to combat that.
Athletes shouldn’t shed their identity when they’re done—success in sports and business require the exact same qualities. In business you’ve got to work hard, you’re gonna be introspective, have great goals, and you’re gonna deal with failure— all the things that made you a great athlete.
View this post on InstagramA post shared by Christian Ponder (@cpseven)
5. Find Your Group of Like-Minded Teammates
In creating the Post, I knew I wasn’t alone. You talk to so many athletes about what they miss most about playing, and it’s usually some version of missing the locker room or the team, which is just another word for community. So I knew I wasn’t alone in those feelings, and before you know, I saw these ideas started happening. I got a lot of feedback, like, why hadn’t this been built already? It seems like an obvious ideas. And I don’t know the answer to that, but I just built it on selfish ambition because I just missed being around other athletes, so I knew I couldn’t have been the only one.
We’re just trying to build that space for athletes to reconnect with their community. Again, it’s a community we’ve been a part of for so long. And what we’re trying to do is create that sports ecosystem that we all participated in, and was created in a way to get the best out of us when it came from an athletic perspective or potential. You had teammates who were there to support you and push you along the way. You had coaches and training and all these resources to unlock as much of that athletic potential as possible. We’re just trying to take that same ecosystem, that same group of people and try to unlock or harness all of that professional business potential that athletes possess because of that athlete operating system as we call it.
So if you miss being a part of that community, if you identify as an athlete, we’re here for you. Our members go from mid 20s to mid 70s. our theme is once an athlete always an athlete, and I think one of the things about athletes is that we always thought our best performance was still ahead of us, so it will always still get better. For us, we’re trying to be that that grease on the wheel that helps you get there.
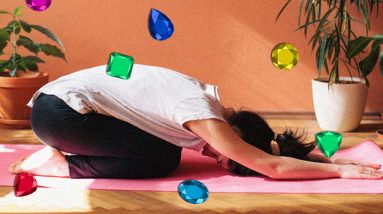
Discover the Serene Power of Embracing Child’s Pose Throughout Your Entire Yoga Class
In a dimly lit yoga studio, I was somewhere between cat-cow and threading the needle when tears started swelling up in my eyes. The feeling of deep grief and hopelessness I fought back all day came to a climax while I was on my Lululemon mat. I quickly folded forward into a child’s pose, ignoring the instructor’s flow, and I stayed put for the rest of class. Doing so felt most aligned for me in the moment.
The power of tuning into what your body and soul needs in the present moment is honest and liberating. But that day in the studio, when I was was overcome with emotion, I wasn’t focused first and foremost on what my body was asking of me. Rather, I was just trying to get myself into a compact position, so as to not be remembered “yoga-class crier.”
I laid there raw, belly between my thighs, arms stretched forward like two railroad tracks, and my head peeking between them. Intrusive thoughts took up residence in my mind: Did the teacher think I was being disruptive? Did the other students see me as an annoyance? Yoga is about taking what you need, right?
I’m a certified yoga teacher who had, at that point, facilitated dozens of classes, during which I’d invited students to consider child’s pose, or balasana, as their home base. I welcomed them to find it at any point in class when they needed a moment to recenter or find their breath. During the yoga class when I found myself in child’s pose as a calming measure, I found myself needing to take my own advice—to take a breath, as I was searching for a home.
A reminder: Child’s pose is yoga
Yoga, which means “union,” in sanskrit refers to a marriage of the mind, body, and soul. Meaning, it’s much more than a purely physical exercise. The asanas, or yoga postures, are just one tool yoga offers to help bring the mind to a state of awareness. Asanas alone, though, are not reflective of the full meaning of yoga.
The eight limbs of yoga are philosophies from Patanjali’s Yoga Sutra, which aim to teach how to live a meaningful life and provide a path to enlightenment. Asana is one of the eight limbs. Samadhi is the last phase of the eight limbs of yoga, and it’s characterized by intense focus and arriving at a state of bliss and union with the self. But sometimes, you must wrestle or struggle to access peace, and clarity.
Maintaining my child’s pose was my personal struggle during that class. I chose to tune in to the strong emotions that washed over me as I sought solace; I resisted the urge to get up and back into the flow, in light of fear for what classmates may have thought of me. I didn’t allow my ego to bully me into prioritizing external acceptance over internal need. With deep breaths and a surrendered heart to the earth, I sat in the uncomfortable awareness of it all for the duration of class.
Even so, I never intended to go to yoga class and then break down emotionally. I didn’t consciously realize that I was in a depleted state and needed turn inward before I could outwardly express. After paying the $28 class rate, I fully intended to participate. In fact, movement often supports me in releasing my uninhibited emotions. But my body—as I would soon learn—was beckoning for something different.
Remaining in a child’s pose allowed me to experience my most authentic form of practice at that moment: awareness of self.
Remaining in a child’s pose allowed me to experience my most authentic form of practice at that moment: awareness of self. And immersing myself into my feelings in that one pose for the duration of class was a a fruitful yoga experience.
There’s no way to control when your proverbial dam breaks, and the resulting flow of emotions may overtake you. When this happens, it’s important to take solace in knowing that the only path to liberation is through the chaos. After you fall apart is when you tend to grow. What may feel like destruction, pain, and turmoil in the moment, is what gives way to fertile soil where you can plant new seeds. From there, opportunities can emerge. Sometimes, getting to that fertile ground may involve crying in child’s pose for an entire yoga class.
Child’s pose can be the ‘right use of energy’
Staying in one posture for an extended period of time supported my total emotional surrender. I allowed myself to soften in a way that movement-focused yoga flows wouldn’t have supported. As my forehead touched the ground, I felt safe to fall apart. Soon, tears spilled over the edges of my mat. When moments of self-doubt arose, I self-soothed by rocking my forehead back and forth. I began tapping into my vagus nerve, activating my parasympathetic nervous system, which contributes relaxation of the body. I acknowledged the temporary nature of my feelings, and affirmed I wouldn’t always feel scattered, but in that moment of barely holding on, my emotions were valid and welcomed. I embodied compassion for myself.
There is a yoga principle called brahmacharya, which means “the right use of energy.” Brahmacharya encourages us to be transformed by our yoga practice by listening to our body and letting the practice serve us; by directing our power away from external desires and instead toward finding peace and happiness within ourselves.
Given that yoga means “union,” it’s crucial that I remain open to receive what I need, even if it shows up in a way that feels disruptive. There is a proclivity in movement classes—and life—to push ourselves beyond our edge; to keep up and look accomplished. What if the real accomplishment were giving yourself precisely what you needed, moment by moment, no more or less? To embrace yourself as you are, with all your weaknesses and strengths? To affirm you are powerful and you always have the choice to take what you need unabashedly? That feels like a worthwhile way to spend a yoga session to me. And so I continue inviting students of mine and myself to consider child’s pose as calming home base in yoga.
My Journey to the Top 3 in “Squid Game: The Challenge” – Unveiling My Fitness Regimen, Winning Tactics, and the Notorious Green Outfits – By Sam Lantz
As a reality television watcher, I became deliriously happy when “Squid Game: The Challenge” picked me to appear on the show’s first season on Netflix.
But after whooping it up with my husband, I got down to work.
Reality shows are usually physical, requiring people to push their bodies to the limit. As an avid gym rat, I wasn’t worried. Working out is about positive mental health for me, which is why I hit the gym seven days a week. I’m tall — a towering 6’7” — so my focus is on “putting roots into the ground,” meaning making my tall frame as still as possible, so I’m not only focusing on whatever muscles I’m working on, but I’m also firming up my core to get a secondary workout as well.
I have three different abdominal/core routines that I like. I choose one to finish with every day: either 2 sets of 25 reps of leg lifts, or 2 sets of 25 reps of side and flat planks, or 2 sets of 25 reps on whatever ab machines are available. Finishing with a different ab workout every day keeps the muscles from becoming too complacent. Working out didn’t come natural to me. In my early life I was a super skinny kid who hated his body. My confidence in the gym came from figuring out that the gym wasn’t a scary place but instead was a space to simply make myself feel better; almost my therapy. Everyone needs that, but especially young people like me who didn’t have the family support to survive life, no less reality television.
So how did the lessons I learned from my workout regimen help me survive all 10 episodes of “Squid Game” where I ended up as one of three finalists out of 456 players?

First, I had watched the original scripted “Squid Game” series that preceded the reality version. Through three separate viewings I knew I would need to prepare to survive games like “Red Light Green Light” that required fast sprints and frozen posing. So, before the January 2023 taping, I prepared by running a quarter of a mile every day on a treadmill. I typically don’t like running, but after that regimen my body assimilated to jumping into sudden action.
Secondly, I knew that the real physical pain from “Squid Game” would be mental. Like most reality shows, the players are confined from the outside world. We were completely infantilized. We lived together in a dorm for 17 long days, only saw sunlight a limited amount every day, didn’t know the time, watch the news, or have a cell phone, and we ate every meal together. It’s no surprise, then, that our emotions hung from a thread — which makes for great television, but oftentimes not great decision-making.
For this I prepared by learning meditation to calm myself every morning, or whenever it was needed. It especially came in handy in the “white room of doom” where we were staged before each challenge. I also came to peace with giving up control. My “Squid Game” life existed in an artificial world created by the show’s producers. I knew to expect nothing, which helped give me the balance needed to survive sudden upsets or player drama. There was a flow to those 17 days, so I did my best to not fear it or fight it, but to flow along wherever it took me.
Finally, I hid my strengths. Luckily, the wardrobe design on “Squid Game” required players in shapeless green tracksuits. Mine was sized double extra-large, which meant it was easy to hide my physique. As a reality show watcher, I am aware of the universal rule that says the players who are the most in shape tend to have a target on their back because our reptilian brains tell us that they are threats.
I downplayed physical strength which helped me focus more on the social and mental rigor the game required. I became friends with everyone. I hugged people when they needed hugs, I shook hands and high-fived when others achieved victory. I made a specific choice to be everyone’s favorite number three — Not their best friend and not their worst enemy.
Instead, I just wanted to be the low-key guy who would never be considered a threat, and in a situation designed around identifying those who would be a threat to your game, this social interaction was key. In the end, the competition was less about physical challenges and more about social relationships, mental fortitude, and chance.
“Squid Game” gave me the gift of understanding that I can withstand anything. Growing up gay in a household that didn’t want me, I was often told I would never amount to anything. That gave me the strength I knew I had before “Squid Game.” But by pushing me to new extremes, I realized just how strong I had become.
The game of life is not unlike the game of television. My time on “Squid Game: The Challenge” didn’t result in millions in prize money, but I learned it had an unexpected payoff: an awareness of how strong I really am, outside and in.
Sam Lantz is an artist living in Fort Lauderdale. He was among the top three finalist in “Squid Game: The Challenge” on Netflix.
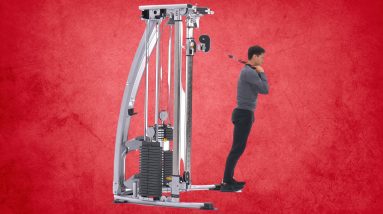
Tips for Strengthening Abs with the Standing Rope Crunch Technique
Are you looking for an exercise that can strengthen your core and help you get the toned midsection you desire? Standing Rope Crunches are the perfect solution! This challenging exercise targets your abdominal muscles, obliques and lower back, helping you build strength and burn calories. With FitGAG’s expert guide, you’ll be able to master Standing Rope Crunches and achieve your fitness goals. So what are you waiting for? Get started on your Standing Rope Crunch journey today!
Exercise Information
The Standing Rope Crunch is a resistance training exercise that targets the muscles in the core. This exercise involves using a rope to add resistance and challenge your core muscles throughout the entire range of motion, making it an effective workout for those looking to strengthen their core. Let’s dive into some general information about this exercise:
Level
The Standing Rope Crunch is suitable for individuals of all fitness levels, from beginners to advanced athletes.
Equipment
To perform the Standing Rope Crunch, you will need a rope.
Type of Exercise
The Standing Rope Crunch is an isolation exercise that targets the muscles in the core, involving a single-joint movement that mainly focuses on one specific muscle group.
Standing Rope Crunch: Working Muscles
The Standing Rope Crunch is an isolation exercise that primarily targets the muscles of the abdominal region. This exercise involves using a rope attached to a high anchor point, such as a pull-up bar, to add resistance to the traditional crunch motion. In this section, we will discuss the primary and secondary muscle groups that are involved during the Standing Rope Crunch exercise.
Primary Muscle Group: Abdominals
The primary muscle group targeted during the Standing Rope Crunch exercise is the abdominal region, including the rectus abdominis, transverse abdominis, and oblique muscles. These muscles are responsible for flexing the trunk of the body, which is the primary motion of the Standing Rope Crunch exercise.
Secondary Muscle Group: Shoulders
In addition to the primary muscle group, the Standing Rope Crunch exercise also engages the muscles of the shoulders. The rotator cuff muscles and middle deltoid muscles are engaged during the crunching motion to stabilize the joint and maintain proper posture.
By engaging both the primary and secondary muscle groups, the Standing Rope Crunch exercise provides a comprehensive core workout. This makes it an effective exercise for building abdominal muscle strength and size, improving posture and stability, and developing functional fitness for activities in daily life.
Stay tuned for the next section, where we will discuss the benefits of the Standing Rope Crunch exercise.
Benefits of Standing Rope Crunch
Standing Rope Crunch is an exercise that targets your core and offers several benefits. Here are five benefits of incorporating this exercise into your fitness routine:
- Improved Core Strength: Standing Rope Crunch helps improve your core strength by engaging your abdominal muscles and developing overall stability in the core.
- Enhanced Balance and Stability: Standing Rope Crunch engages more muscles in the upper and lower body, which can help improve overall balance and stability.
- Increased Range of Motion: Standing Rope Crunch allows you to work your core through a full range of motion, which can help improve your overall flexibility.
- Reduced Risk of Injury: Standing Rope Crunch can help improve your overall joint stability and reduce the risk of injury and strain on your abdominal muscles.
- Variation and Progression: Standing Rope Crunch can add variation to your core workouts, which can help prevent boredom and stimulate new muscle growth. Additionally, the exercise can be made more challenging by using a heavier rope or increasing the number of reps.
By incorporating Standing Rope Crunch into your fitness routine, you can enjoy these benefits and more. However, it’s important to start slowly and progress gradually to avoid injury and ensure proper form. Additionally, it’s important to incorporate a variety of exercises into your fitness routine to ensure you’re targeting all muscle groups and avoiding boredom.
Standing Rope Crunch: Step-by-Step Instructions
The standing rope crunch is an exercise that works your abdominals and obliques. Here are the step-by-step instructions for performing the standing rope crunch:
Starting Position:
- Hold a rope in both hands, with your palms facing each other.
- Stand with your feet slightly wider than shoulder-width apart.
- Tighten your core and keep your back straight.
Now, let’s move on to the step-by-step instructions for the standing rope crunch:
- Begin by crunching your core, bringing your elbows in towards your torso.
- Pause briefly at the end of the movement, when your elbows are just outside your chest.
- Slowly release the movement and bring your arms back to the starting position.
Repeat the movement for the desired number of repetitions.
Standing Rope Crunch – Proper Form and Technique
The Standing Rope Crunch is an effective exercise that targets the core muscles. This exercise is performed using a rope, and proper form and technique are important to avoid injury and achieve maximum results.
Starting Position
- Stand upright with your feet hip-width apart and the rope looped around your hands.
- Hold the rope with both hands, with your arms extended straight out in front of you.
- Engage your core muscles and maintain a stable base.
Proper Form and Technique
- Crunch the Rope: Crunch the rope by pulling the rope up towards your body, squeezing your core muscles.
- Keep Your Arms Straight: Keep your arms straight and your elbows slightly bent throughout the exercise, using your abdominal muscles to control the movement.
- Return to the Starting Position: Return to the starting position by bringing the rope back to the starting position in front of your body.
- Breathe Deeply: Breathe deeply and regularly throughout the exercise to maintain your energy and focus.
- Gradually Increase Intensity: Gradually increase the number of repetitions or sets of the exercise over time as your abdominal muscles become stronger.
- Incorporate into Your Routine: The Standing Rope Crunch can be a great addition to your core training routine, helping you to build strength and muscle effectively.
By following these tips, you can perform the Standing Rope Crunch with proper form and technique, building and strengthening your core muscles effectively while minimizing the risk of injury. Remember to start slowly, focus on your breathing, and gradually increase the difficulty and intensity of the exercise over time.
Frequency and Progression: How to Get the Most Out of Your Standing Rope Crunch Workouts
The Standing Rope Crunch is a resistance band exercise that targets the core muscles, specifically the obliques and rectus abdominus. In this section, we will discuss how to properly incorporate the Standing Rope Crunch into your workout routine and how to progress with this exercise over time.
Frequency
To see significant results with the Standing Rope Crunch, it is recommended to perform this exercise 2-3 times a week. However, it is important to listen to your body and avoid overtraining. If you feel any pain or discomfort, stop the exercise immediately. You can also alternate between the Standing Rope Crunch and other core exercises, such as planks or Russian twists.
Progressive Overload
To progress with the Standing Rope Crunch, it is important to gradually increase the difficulty of the exercise over time. Start with a lighter band resistance and gradually increase the resistance as you become stronger. Another way to progress is to decrease the rest time between sets or increase the number of repetitions. Gradually increase the resistance and reps/sets and avoid adding too much too quickly.
Mix It Up
To prevent boredom and keep your Standing Rope Crunch workouts fresh, it is important to mix up your exercise routine. You can perform the Standing Rope Crunch with different types of bands or vary the number of reps and sets. You can also incorporate other core exercises, such as bicycles or mountain climbers.
Proper Form
Proper form is essential when performing the Standing Rope Crunch to avoid injury and get the most out of the exercise. Start by holding the band with both hands and standing with your feet shoulder-width apart. Your hands should be in front of your chest with your elbows slightly bent. Pull the band apart by spreading your hands out to your sides, keeping your elbows in line with your shoulders. Squeeze your abdominal muscles together at the end of the movement. Return to the starting position by slowly bringing your hands back together. Keep your core engaged and your back straight throughout the movement.
Track Your Progress
To ensure you are making progress and staying on track with your Standing Rope Crunch workouts, it is important to track your progress. Keep a workout journal or use a fitness app to log the band resistance, reps, and sets for each exercise. This will help you identify areas where you need to improve and keep you motivated to continue pushing yourself.
Incorporating the Standing Rope Crunch into your core workout routine can be a great way to build strength and improve your posture. By following these tips for frequency, progressive overload, and proper form, you can ensure that you are getting the most out of your Standing Rope Crunch workouts and reaching your fitness goals.
Mistakes of Standing Rope Crunch Exercise
The standing rope crunch exercise is a great way to target your abdominal muscles and strengthen your core. However, like any exercise, there are common mistakes that can reduce its effectiveness and increase the risk of injury. Here are five mistakes to avoid during the standing rope crunch exercise:
- Not using proper form: Using poor form during the standing rope crunch exercise can reduce its effectiveness and increase the risk of injury. It’s essential to maintain proper alignment of the spine, hips, and shoulders throughout the exercise.
- Using too much resistance: Using too much resistance during the standing rope crunch exercise can increase the risk of injury and reduce its effectiveness. Instead, focus on using a rope with appropriate resistance that allows you to maintain proper form.
- Not using a full range of motion: Neglecting to use a full range of motion during the standing rope crunch exercise can reduce its effectiveness. Make sure to fully extend your arms in front of your body before returning to the starting position.
- Not engaging the abdominal muscles: Engaging the abdominal muscles is essential to ensure that you are targeting the correct muscles during the standing rope crunch exercise. Failure to engage these muscles can reduce the effectiveness of the exercise.
- Not using proper breathing: Using improper breathing technique during the standing rope crunch exercise can reduce its effectiveness and increase the risk of injury. Make sure to exhale as you pull the rope towards your chest and inhale as you return to the starting position.
By avoiding these common mistakes, you can ensure that you are getting the most out of your standing rope crunch exercise while reducing the risk of injury. Remember to use proper form, use an appropriate resistance, use a full range of motion, engage the abdominal muscles, and use proper breathing throughout the exercise. With consistent practice, you can improve your core strength and develop better posture with the standing rope crunch exercise.
Variations of Standing Rope Crunch: Add Challenge to Your Core Training
Standing Rope Crunch is a great exercise to help target and strengthen your core muscles. However, doing the same exercise every day can become monotonous over time. Here are some variations to add challenge and variety to your training routine and challenge your core muscles in different ways:
Single-Arm Standing Rope Crunch
This variation involves performing the exercise with one arm at a time, which adds more challenge to your balance and stability and targets your core muscles from a different angle. Be sure to keep your core engaged and your feet slightly apart as you perform the exercise.
Standing Rope Crunch with Resistance Bands
This variation involves using heavier resistance bands to add extra resistance and challenge your core muscles. Be sure to use proper form and technique and avoid jerking or pulling the bands.
Standing Rope Crunch with Pause
This variation involves pausing for a few seconds at the end of each repetition, which challenges your core muscles and improves your overall muscular endurance. Be sure to keep your core engaged and your feet slightly apart throughout the exercise.
Standing Rope Crunch with Isometric Hold
This variation involves holding the fully contracted position of the exercise for a few seconds, which challenges your core muscles and improves your overall muscular endurance. Be sure to keep your core engaged and your feet slightly apart throughout the exercise.
Standing Rope Crunch with Cross Body Reach
This variation involves adding a cross body reach to the exercise, which targets your core muscles and improves your overall core strength and stability.
Incorporating these variations into your Standing Rope Crunch routine can help you add challenge and variety to your core training and achieve greater gains in overall core strength and athletic performance. As always, make sure to use proper form and technique to avoid injury.
Standing Rope Crunch: 5 Alternatives to Strengthen Your Core
The standing rope crunch is a great exercise for strengthening your core and improving your posture. However, if you’re looking to mix up your routine or add some variety, there are plenty of alternatives you can try. In this section, we’ll explore five exercises that target your core and can help you build strength and improve your posture.
Plank
The plank is a great exercise for targeting your core and improving your posture.
- Lie face down on the floor and prop yourself up on your forearms.
- Engage your core and lift your body up, keeping your back straight and your feet together.
- Hold the position for the desired amount of time before lowering back down.
Bird Dogs
Bird dogs are a great exercise for targeting your core and building strength.
- Start on your hands and knees and extend one arm in front of you and the opposite leg behind you.
- Engage your core and keep your back and leg straight while you hold the position.
- Lower your arm and leg back down and repeat on the opposite side for the desired number of repetitions.
Hollow Holds
Hollow holds are a great exercise for targeting your core and building strength.
- Lie face up on the floor and lift your legs and arms off the ground.
- Engage your core and keep your back and legs straight while you hold the position.
- Lower your legs and arms back down and repeat for the desired number of repetitions.
Flutter Kicks
Flutter kicks are a great exercise for targeting your core and improving your posture.
- Lie face down on the floor and lift your legs off the ground.
- Alternate kicking your legs up and down while keeping your core engaged.
- Continue for the desired number of repetitions.
Crunches
Crunches are a great exercise for targeting your core and strengthening your abs.
- Lie face up on the floor and bend your knees so your feet are flat on the ground.
- Engage your core and crunch your chest towards your knees.
- Lower your chest back down and repeat for the desired number of repetitions.
Incorporating these alternatives to standing rope crunch exercises into your routine is a great way to strengthen your core and improve your posture. These exercises require little to no equipment and can be done at home or at the gym. Give them a try and see how they work for you!
Standing Rope Crunch: Tips and Tricks for Developing Stronger Core Muscles
The Standing Rope Crunch is an excellent exercise to help you develop stronger core muscles. In this section, we’ll share some tips and tricks to help you perform the Standing Rope Crunch correctly and get the most out of it.
- Warm-Up: Before performing the Standing Rope Crunch, it’s important to warm up your entire core. You can do this by performing some light cardio or dynamic stretching, such as side bends.
- Use the Right Equipment: To perform the Standing Rope Crunch, you need a rope and a sturdy object to secure it to. Make sure you choose the right resistance level for your needs and follow the manufacturer’s instructions for use.
- Proper Form: Maintaining proper form is crucial when performing the Standing Rope Crunch. Begin by holding the rope securely in both hands, with your palms facing down. Keeping your arms straight, pull the rope up until your hands are at chest level, then slowly return to the starting position.
- Engage Your Core Muscles: To perform the Standing Rope Crunch correctly, you need to engage your core muscles. Focus on squeezing your abs as you pull the rope up.
- Use the Right Repetition Range: Aim to perform 2-3 sets of 8-12 reps with the Standing Rope Crunch.
- Mix it Up: Mixing up your Standing Rope Crunch routine can help keep your workout fresh and challenging. You can try different variations, such as changing the resistance level or using a different hand position.
- Stretch Afterwards: After performing the Standing Rope Crunch, it’s important to stretch your entire core, especially your abs and lower back.
- Listen to Your Body: As with any exercise, it’s important to listen to your body and avoid pushing beyond your limits. If you feel any discomfort or pain, stop the exercise immediately.
Incorporating these tips and tricks into your Standing Rope Crunch routine can help you get the most out of this exercise and achieve stronger core muscles. Remember to always maintain proper form, engage your core muscles, and listen to your body. With time and practice, you’ll be able to perform the Standing Rope Crunch like a pro and enjoy the benefits of stronger and more toned core muscles.
Incorporating Standing Rope Crunches into Your Workout Routine for Maximum Effect
Standing rope crunches are a great exercise for strengthening your core and improving your posture. Here are some tips to help you incorporate this exercise into your workout routine for maximum effect:
- Warm-up properly: Before doing standing rope crunches, it’s important to warm up your core with exercises like side planks, bridges, and bird dogs.
- Use proper form: To perform standing rope crunches, stand with your feet shoulder-width apart and hold a resistance band with both hands. Extend your arms straight out in front of you, holding the ends of the band at shoulder height. Then, pull the band towards the top of your head by crunching your abs and bringing your elbows towards your knees. Return to the starting position and repeat.
- Mix up your routine: Don’t just perform standing rope crunches in isolation. Mix it up by incorporating other core exercises, such as planks, V-sits, and Russian twists.
- Use progressive overload: To continue to see progress, you’ll need to use progressive overload, which means gradually increasing the resistance or repetitions over time.
- Don’t overdo it: It’s important to give your muscles time to recover, so don’t overdo it with standing rope crunches. Aim to perform the exercise for 2-3 sets, 1-2 times per week.
- Focus on your breathing: It’s important to regulate your breathing throughout the exercise to ensure that you’re getting enough oxygen to your muscles. Inhale as you crunch and exhale as you return to the starting position.
- Engage your core: To get the most out of standing rope crunches, make sure to engage your core muscles, including your abs, lower back, and obliques. This will help you maintain proper form and prevent injury.
- Rest between sets: Allow your muscles time to recover between sets. Rest for 60-90 seconds between sets to ensure that you’re performing each rep with proper form.
- Incorporate standing rope crunches into your workout routine: In addition to incorporating standing rope crunches into your workout routine, consider doing them as part of a superset or a circuit to challenge your muscles even more.
By incorporating these tips into your workout routine, you’ll be well on your way to maximizing the benefits of standing rope crunches and achieving stronger core muscles and improved posture.
Ultimate Workout Plan for Standing Rope Crunch
Standing Rope Crunch is an excellent exercise for strengthening and toning your core. Here’s a one-week workout plan to help you incorporate Standing Rope Crunch into your routine:
Day 1: Warm-up
- Warm-up: 5-10 minutes of cardio
- Standing Rope Crunch: 3 sets x 12-15 reps
- Plank: 3 sets x 30-60 seconds
- Hanging Leg Raises: 3 sets x 10 reps
- Decline Crunches: 3 sets x 12 reps
- Cool-down: 5-10 minutes of stretching
Day 2: Rest Day Day 3: Lower Body
- Warm-up: 5-10 minutes of cardio
- Standing Rope Crunch: 3 sets x 12-15 reps
- Squats: 3 sets x 10 reps
- Lunges: 3 sets x 10 reps
- Calf Raises: 3 sets x 12 reps
- Cool-down: 5-10 minutes of stretching
Day 4: Rest Day Day 5: Full Body
- Warm-up: 5-10 minutes of cardio
- Standing Rope Crunch: 3 sets x 12-15 reps
- Burpees: 3 sets x 12 reps
- Mountain Climbers: 3 sets x 10 reps
- Jump Squats: 3 sets x 15 reps
- Cool-down: 5-10 minutes of stretching
Day 6: Rest Day Day 7: Core
- Warm-up: 5-10 minutes of cardio
- Standing Rope Crunch: 3 sets x 12-15 reps
- Russian Twists: 3 sets x 10 reps
- V-Ups: 3 sets x 10 reps
- Side Plank: 3 sets x 15 seconds (each side)
- Cool-down: 5-10 minutes of stretching
Remember to maintain proper form and technique when performing Standing Rope Crunch. Keep your movements slow and controlled, and focus on engaging your core..

Get Ready to Crush Your Lower Body with Shelley Hennig’s Intense Workout
Shelley Hennig is steaming up television screens all around the world with her star turn in Netflix’s hit series Obliterated, but in order to get into insane shape and look stunning sans-clothing, Hennig knew that that she would need to give her all to the process of sculpting her physique. Thanks to her years as a competitive dancer, the former Miss Teen USA is usually fit and ready to go, but for the role of “Ava Winters,” and to be believable as a CIA field agent, Hennig enlisted a strength and conditioning coach to add around ten pounds of lean muscle mass. Here’s the “Obliterated” lower-body workout that completed the mission.
Trained by Simon Otero at Rough Rider Barbell Club in Albuquerque, New MM, Hennig had only a few weeks to prepare for her role as an elite special forces agent in the action-comedy-drama, “Obliterated,” streaming now on Netflix. As a former competitive dancer who loves to be active, Hennig usually maintains her fitness levels by attending sessions at Cardio Barre where she is able to execute fast ballet movements to get her sweat dripping and the body pumping. Hennig also loves to box and participates in Yoga sculpting sessions.
For “Obliterated,” the former beauty queen wanted to move away from the lighter ballet look, in order to present herself as a kick-ass character. To do that, she understood that weight training would be essential in order to get killer quads and a buff booty for those bikini and virtually-naked scenes, and so she enlisted the services of strength and conditioning coach, Simon Otero. “When Shelley came to me, the goal was to put on muscle while still maintaining an athletic and feminine look for her role in Obliterated,” he explains. “We achieved Shelley’s physique by an assortment of standard compound movements and accessories, targeted at building strength for the whole body.” It was a new experience for the star, but she revelled at the chance to throw herself into something new. “I’d never done that and, I don’t know, I felt jacked,” explained Hennig of the results, in an exclusive interview with M&F (read it here). “And I felt probably the strongest I’ve ever felt in my life and it felt really good.”
View this post on InstagramA post shared by Shelley Hennig (@shelleyhennig)
Compound movements such as squats and deadlifts engage multiple muscle groups, activating several muscles simultaneously, whereas accessory movements target more specific muscles or groups, usually involving a single joint. Examples of accessory exercises include leg extensions or calf raises. “A typical week would mix days of upper-body focus, lower-body focus, and a day of full body movements and conditioning,” adds Simon Otero.
As you can see from the example workout below, Shelley Hennig worked her whole-body during workouts, but usually with a focus on a particular area such as lower-body. Mixing compound and accessory movements is a great way to enhance overall strength and muscle mass because you are taxing a wide range of muscle fibers and building stamina as you feel the burn. Depending on your own level of fitness, feel free to try the workout below by making individual adaptions where necessary, increasing or decreasing the sets, reps, or time on each exercise.
The physique that Shelley Hennig achieved for those scorching scenes in Obliterated is anything to go by, this workout is a winner.
 Courtesy of NetflixShelley Hennig’s “Obliterated” Lower-Body Workout
Warmup
Dynamic Stretching
Seated Row or Ski erg — 2 minutes
Workout
Medicine Ball Slam — 4 Sets x 10 Reps
Kettlebell Swing — 4 Sets x 10 Reps
Romanian Deadlift — 4 Sets x 8 Reps
Goblet Squat — 3 Sets x 8 Reps
Dumbbell Farmers Carry for time — 3 Sets x 1 minute
Leg Extensions — 2 Sets x 8 Reps
Calf Raises — 2 Sets x 8 Reps

Stay Fit and Festive This Christmas Season
Hi friends! I hope that you have a wonderful day, and a very Merry Christmas to my friends who are celebrating today. Wishing you joy, happiness, love, and vibrant health. Thank you so much for being a part of my life!

For now, we’re going to enjoy some coffee and nana’s egg casserole, watch the babies open gifts, and spend the day in our jammies with family.
Have a great day and I’ll see ya soon.
xoxo
Gina
The post have yourself a merry little Christmas appeared first on The Fitnessista.

Key Insights from the 2024 CrossFit Season Competition: A Must-Read for Fitness Enthusiasts
The 2024 CrossFit season is fast approaching. The 2024 CrossFit Open will begin on Feb. 29, 2024, and the dates and locations for the 2024 CrossFit Semifinals are already known.
So, what should participating athletes in the 2024 CrossFit season know to prepare for success? Well, the 2024 CrossFit Games Competition Rulebook was released on Dec. 21, 2024. While most of it was standard operating procedure in line with the past couple of years, there were some notable items to be aware of.
View this post on InstagramA post shared by CrossFit Games (@crossfitgames)
[Related: Two-Time CrossFit Games Winner Justin Medeiros Entered a Powerlifting Competition and Totaled Over 1,400 Pounds]
2024 CrossFit Games Competition Rulebook
Below are four key takeaways from the 2024 CrossFit Games Competition Rulebook, courtesy of information provided by Morning Chalk Up managing editor, Joe Genetin-Pilawa:
1. No Title Sponsor Listed
“In previous years, the Games title sponsor (most recently NOBULL) appeared on the rulebook cover and throughout [its pages],” Genetin-Pilawa says. He explains that the absence of a title sponsor on the 2024 CrossFit Games Competition Rulebook suggests that a title sponsor has not been officially confirmed, noting that NOBULL’s contract with CrossFit expires at the end of 2023.
2. Important Changes to Athlete Eligibility Rules
Athlete eligibility for each stage of the competition is receiving a small facelift.
“For example, athletes who receive an exemption to compete in a region outside their country of citizenship are now required to re-apply each year — the exemption doesn’t carry over,” Genetin-Pilawa says.
Outside partners will organize all seven Semifinal events. However, CrossFit will continue to program the tests, manage scoring, and determine invitations, according to Genetin-Pilawa. The total number of competitors at each Semifinal has been standardized; every Semifinal will feature 40 Individual men, 40 Individual women, and 30 Teams (Rule 3.02).
View this post on InstagramA post shared by CrossFit Games (@crossfitgames)
There are other athlete eligibility rules that participating athletes should be aware of. The above is one example, Genetin-Pilawa explains, but competitors who expect to advance past the Open should prioritize the time to read the eligibility rules further.
3. Important Video Submissions and Judging Rule Changes
One example of changes to the rules is a revision to the “major penalty” category for video submissions, according to Genetin-Pilawa. Previously, a “major penalty” was a flat 15-percent score adjustment. However, in 2024, that adjustment can be “15 to 40 percent,” depending on the severity of the violation (Rule 1.22).
There are other adjustments like this to judging and video submissions. Participating 2024 CrossFit season athletes should familiarize themselves with the adjustments to avoid being surprised should they encounter one or more of them.
4. Be Aware of Appendix D
“With a significant portion of the Games season occurring virtually, CrossFit has added a set of ‘Virtual Competition Guidelines,’” Genetin-Pilawa says. “These guidelines include setup considerations, video submission requirements and penalties, an outline of best practices, and a table of standard weight conversions between pounds and kilograms.”
Genetin-Pilawa explains that this is a welcome addition as more specificity and clarity of such information is usually a boon for athletes and one that he says athletes should examine closely.
For a detailed breakdown of more changes to the 2024 CrossFit rulebook, head here.
Featured image: @crossfitgames on Instagram
The post 4 Takeaways From the 2024 CrossFit Season Competition Rulebook appeared first on BarBend.